Laundry Room Layout Dimensions: Measure For A Real-World Fit
Master your floor plan with our cheat sheet on laundry room layout dimensions. Learn the minimums for 5x7 layouts, door swings, and ergonomic folding zones.
Author:George EvansJun 18, 202610 Shares10.2K Views
Mastering Laundry Room Layout Dimensions: Standards, Clearances, And Flow
We often treat the laundry room as an architectural afterthought-a leftover box where we hide the noise and the mess.
But as a designer, I see it differently. I view the laundry room as a high-performance engine. If the pistons don't have room to fire, the engine seizes.
In a home, if you don't have the clearance to open a dryer door without hitting your hip against a wall, the daily rhythm of your life seizes, too.
Designing a functional laundry space requires a shift in thinking. It is not about fitting boxes into a room; it is about choreographing human movement.
We must account for the arc of a door swing, the bend of a knee, and the reach of an arm. When we get the dimensions right, the room disappears into the task. When we get them wrong, the room becomes an adversary.
This guide details the specific architectural standards, clearance zones, and layout strategies required to build a space that works as hard as you do.
The Invisible Inches: Why Dimensions Matter More Than Square Footage
In architecture, we talk about negative space-the air between objects. In a laundry room, this negative space is where the work happens.
A common error I see in DIY renovations is measuring the appliances but forgetting the human operator. You are not just storing a washer; you are housing the activity of washing.
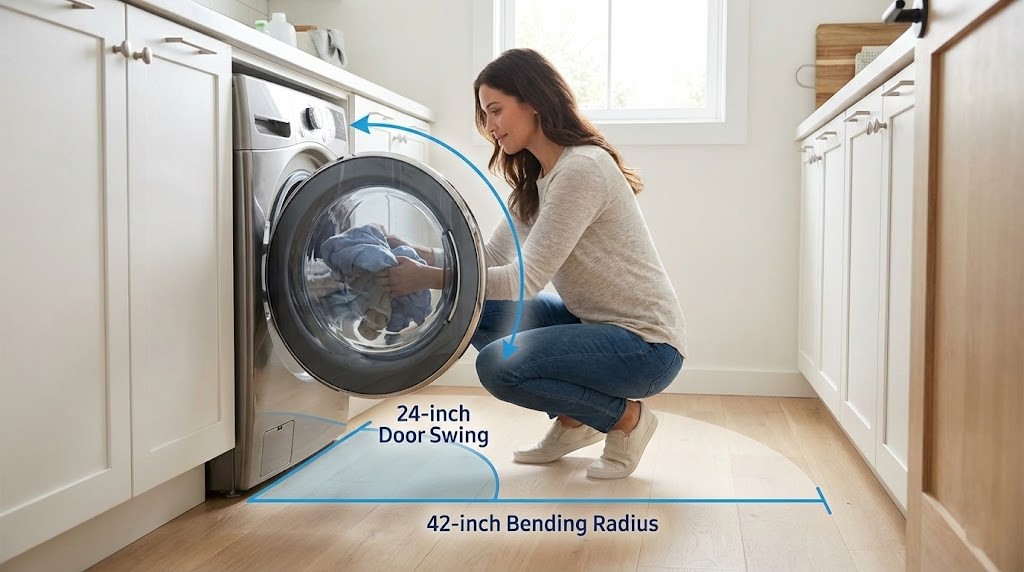
The most critical invisible dimension is the Loading Zone. A standard front-loading washer door swings out approximately 20 to 24 inches (50-60 cm).
If you only leave 36 inches of clearance in front of the machine, you are left with barely a foot of space to stand when the door is open. This forces you to step awkwardly to the side or back out of the room entirely just to switch loads.
We also must account for the Bending Radius. To unload a dryer, an average adult needs about 42 inches (107 cm) of clear floor space to crouch or bend comfortably without their lower back hitting a wall or island behind them.
If you are designing a galley layout, skimping on this width turns laundry day into a contortionist act.
Takeaway:Always design the space first; the cabinets and appliances earn their place only after the human movement is secured.
What Most People Want In A Laundry Room?
Most people don’t actually want a bigger laundry room. They want a laundry room that behaves: no bottlenecks, no clutter pileups, no damp smells, no awkward bending, no missing socks roaming the house.
The Big 6 Things People Notice Every Week
- Enough working clearance in front of machines (doors open, basket fits, person stands comfortably)
- A real folding surface (even if it’s compact)
- Storage that matches the supplies (tall bottles, bins, linens, cleaning tools)
- A place to hang-dry (a rod or rack that doesn’t block circulation)
- Good lighting (stains and labels are easy to see)
- Ventilation that keeps it fresh (heat and moisture don’t linger)
The Nice-To-Haves That Become Favorites
- Utility sink (stain rinsing, mop cleanup, hand-wash items)
- A drop zone for not clean, not dirty items (hooks + a basket)
- A spot for trash + lint (tiny, but it prevents mess creep)
- Charging/outlet planning for an iron, steamer, or cordless vacuum
- Seating perch (even a small stool) if the room doubles as a mudroom
Two Scenarios Of How Priorities Shift
Scenario A:The small-space laundry closet has a door that doesn’t collide, lighting that doesn’t cast shadows, and storage that goes vertical without shrinking the standing zone.
Scenario B:The family's utility laundry workflow includes a sorting station, a wide folding counter, hanging space, and enough open floor area that two people can use the room without playing bumper cars.
A Simple Prioritization Rule That Prevents Regret
If you’re deciding between features, prioritize in this order:
- Clearances and door behavior (if the room is awkward to stand in, everything else is noise)
- Lighting + ventilation (performance and comfort)
- Folding + storage (daily usability)
- Sink + specialty add-ons (upgrade layer)
Takeaway:The best laundry rooms deliver the same feeling every time-clear space to work, light you can trust, air that stays fresh, and storage that doesn’t steal your aisle.
Standard Appliance Dimensions & The Real Footprint
This section clarifies the difference between the box dimensions listed on a website and the actual installed footprint that dictates your floor plan.
Manufacturer specifications can be deceptive. A brochure might list a washing machine depth as 30 inches, but if you frame a closet exactly 30 inches deep, you will find yourself with a door that won't close and a crushed dryer vent. We must distinguish between the Unit Depth and the Installed Depth.
- Standard Size:Typically 27 inches wide by 30-33 inches deep (69 x 76-84 cm).
- Compact Size:Typically 24 inches wide by 24-26 inches deep (61 x 61-66 cm).
- Mega/Large Capacity:Can reach up to 30 inches wide and 34+ inches deep (76 x 86+ cm).
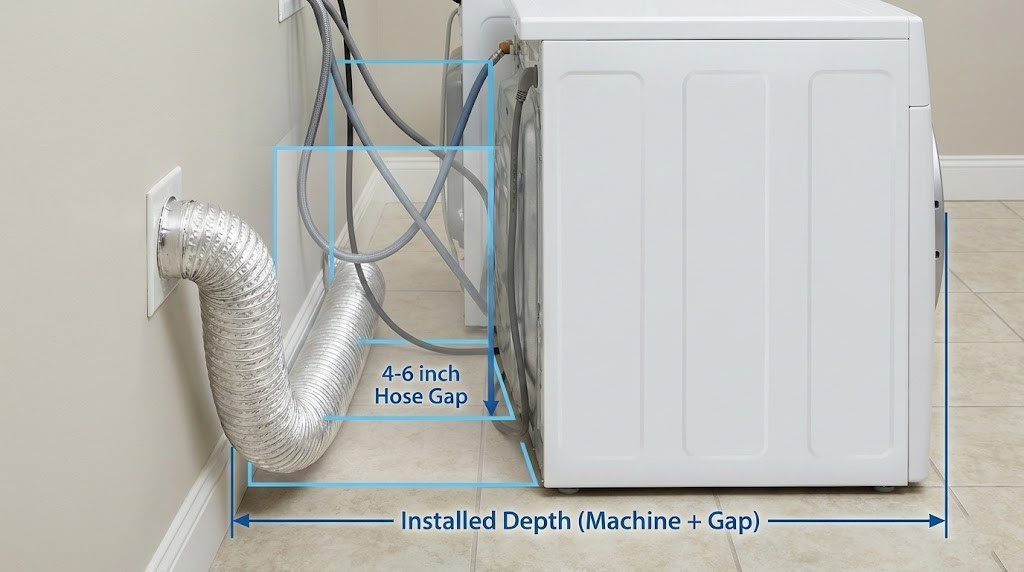
The Hose Gap: Depth Requirements Behind The Scenes
The Hose Gap is the most frequently overlooked dimension in laundry design. You absolutely must allocate 4 to 6 inches (10-15 cm) of depth behind the machines.
This space accommodates:
- The Dryer Vent: A standard 4-inch rigid or semi-rigid duct needs room to turn 90 degrees without kinking. A crushed vent is not just an annoyance; it is a severe fire hazard and efficiency killer.
- Water Lines: Hot and cold water hoses, plus the drain hose, need space to loop without pinching.
- Electrical/Gas: Plugs and gas shut-off valves add bulk.
If space is extremely tight, you can install a recessed dryer vent box in the wall cavity, which allows the machine to sit about 3-4 inches closer to the wall.
However, for planning purposes, always assume the machine will stick out 6 inches further than its spec sheet says.
Side-By-Side Vs. Stacked: Making The Vertical Decision
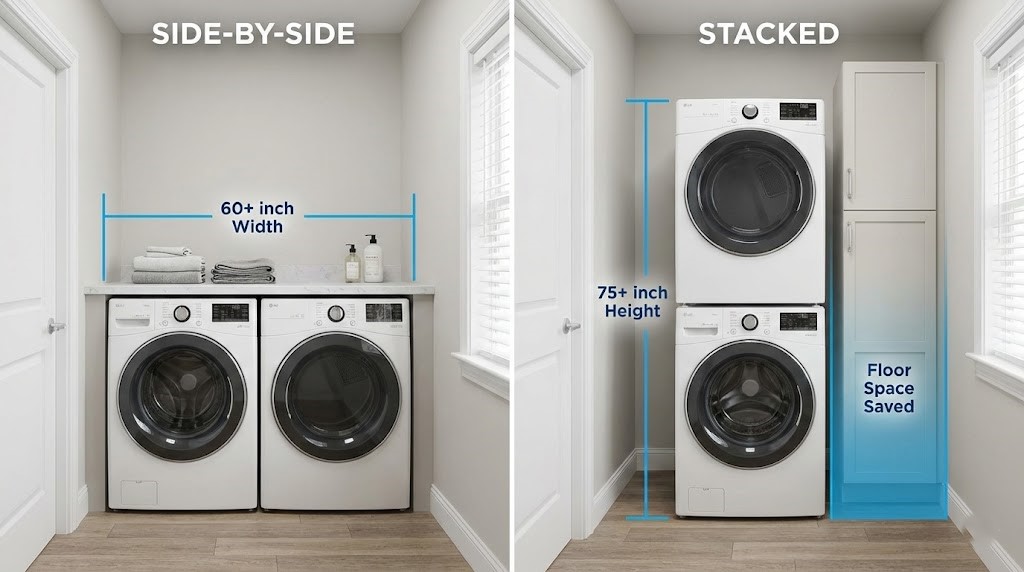
Your layout choice here dictates your room's volume usage.
- Side-by-Side:Requires a horizontal span of at least 60 inches (5 feet / 152 cm), including the gap between machines. This offers the best ergonomics for sorting and allows for a countertop workspace above.
- Stacked:Consolidates the footprint to roughly 30 x 33 inches. This frees up floor space for tall storage or a utility sink but puts the dryer controls at a height of nearly 6 feet (1.8 m), which can be a challenge for shorter users.
Takeaway:Never draft walls based on the appliance's box size; always draft for the installed footprint, including the breathing room behind them.
Critical Layout Archetypes: Dimensions & Floor Plans
We will analyze the three most effective layout shapes to determine which one maximizes your specific square footage.
The Galley Layout (Corridor Style)
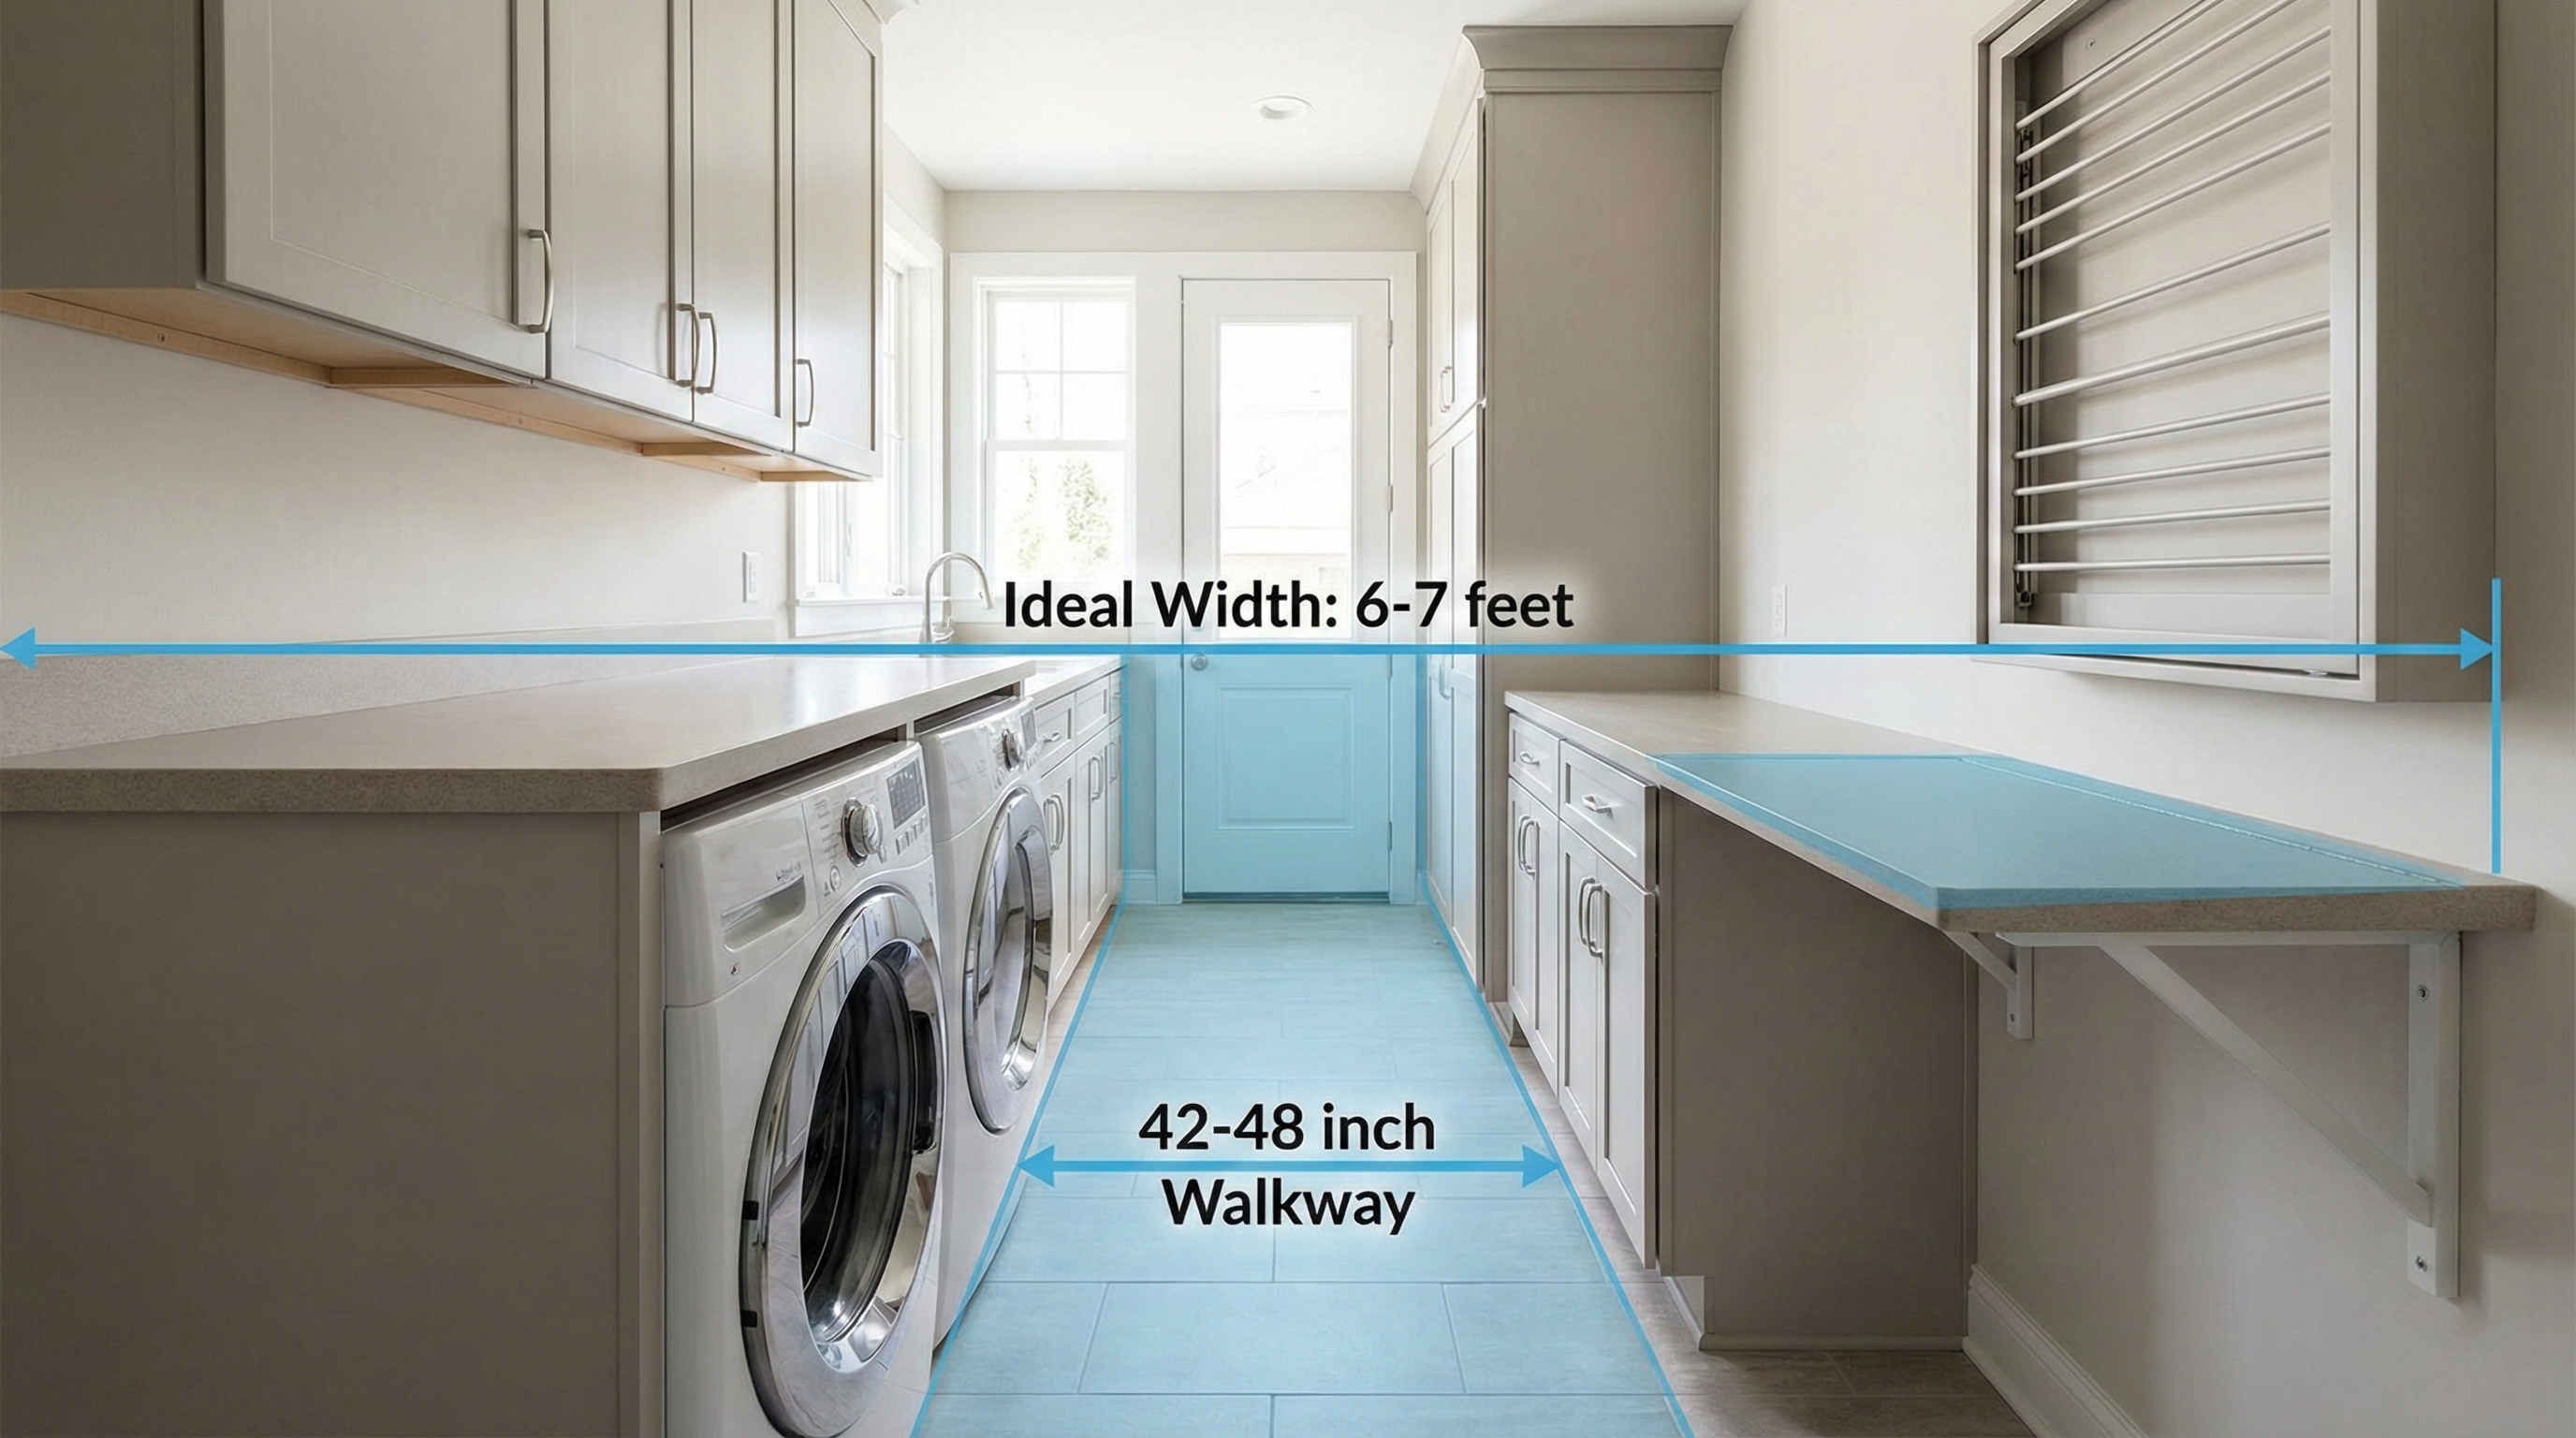
The Galley is the efficiency champion, ideal for pass-through spaces or narrow additions.
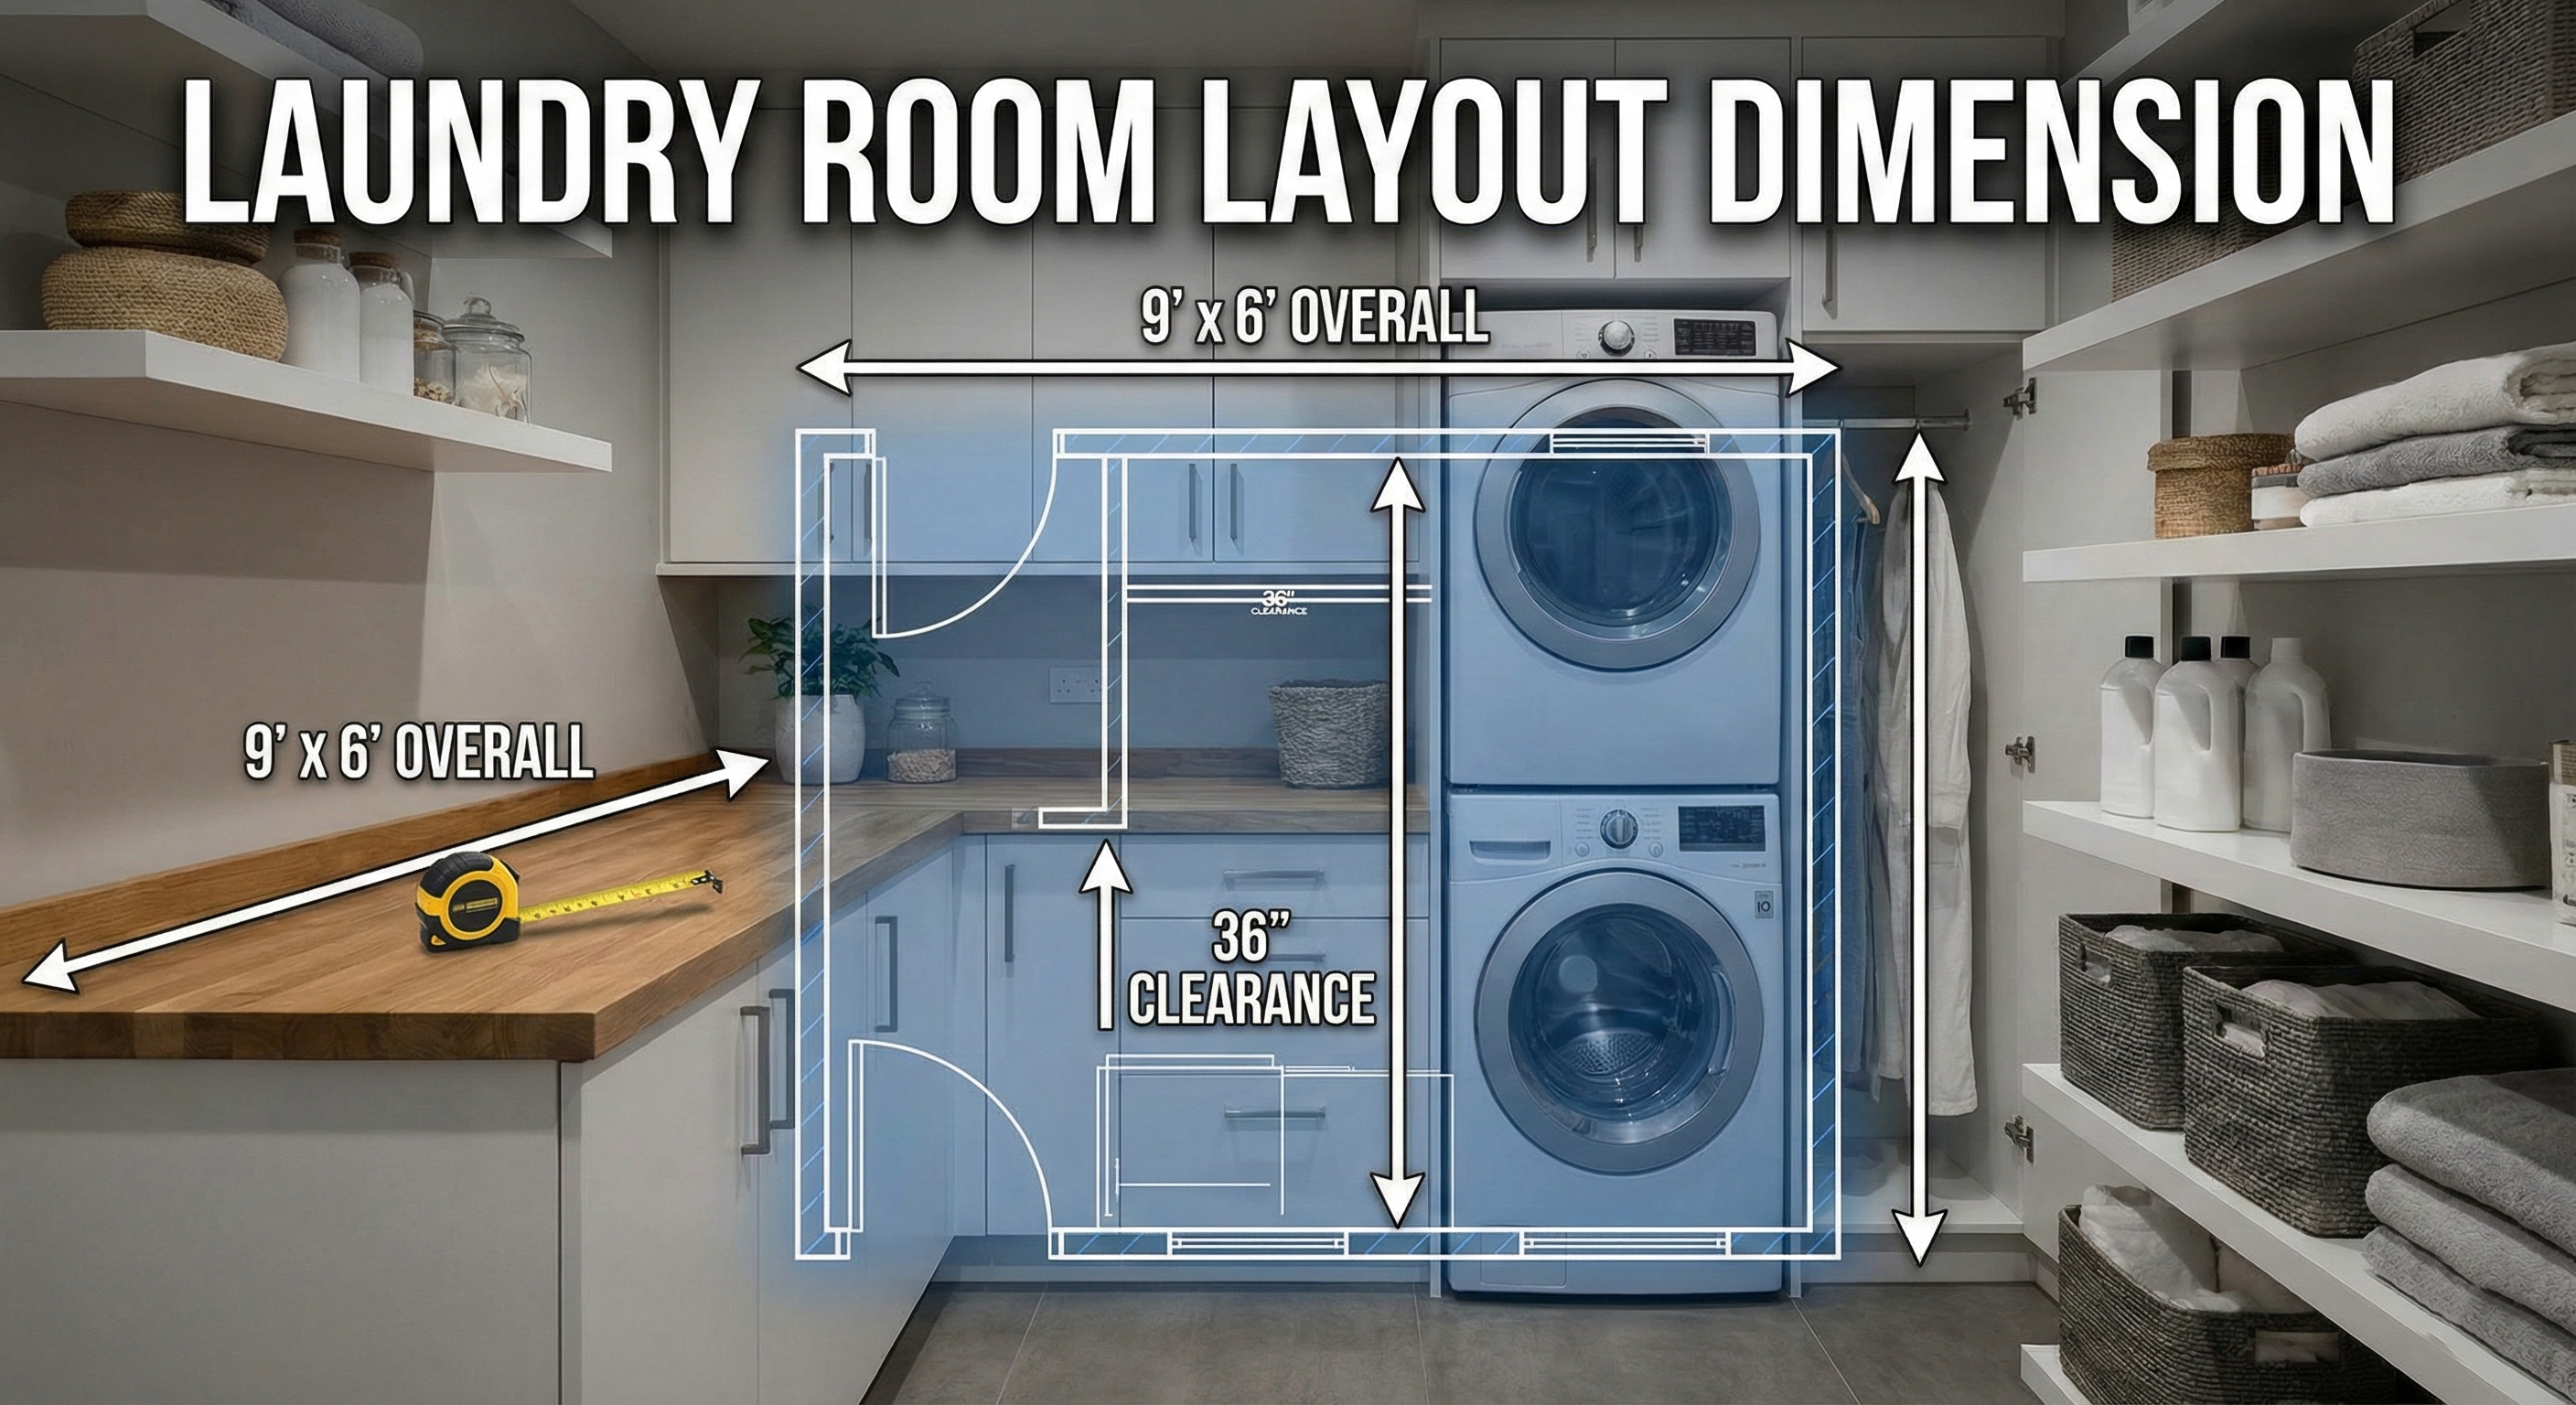
- Minimum Width:5 feet (1.5 m) is the absolute hard minimum. This allows for 30-inch deep machines on one side and a tight 30-inch walkway. It is functional, but cozy.
- Ideal Width:6 to 7 feet (1.8-2.1 m). This allows for full-depth cabinetry and a comfortable 42-48 inch walkway.
- Strategy:Place all tall obstructions (stacked units, broom closets) on one wall to keep sightlines open. Keep the opposite wall for shallow storage or drying racks to preserve the sense of width.
The L-Shaped Layout
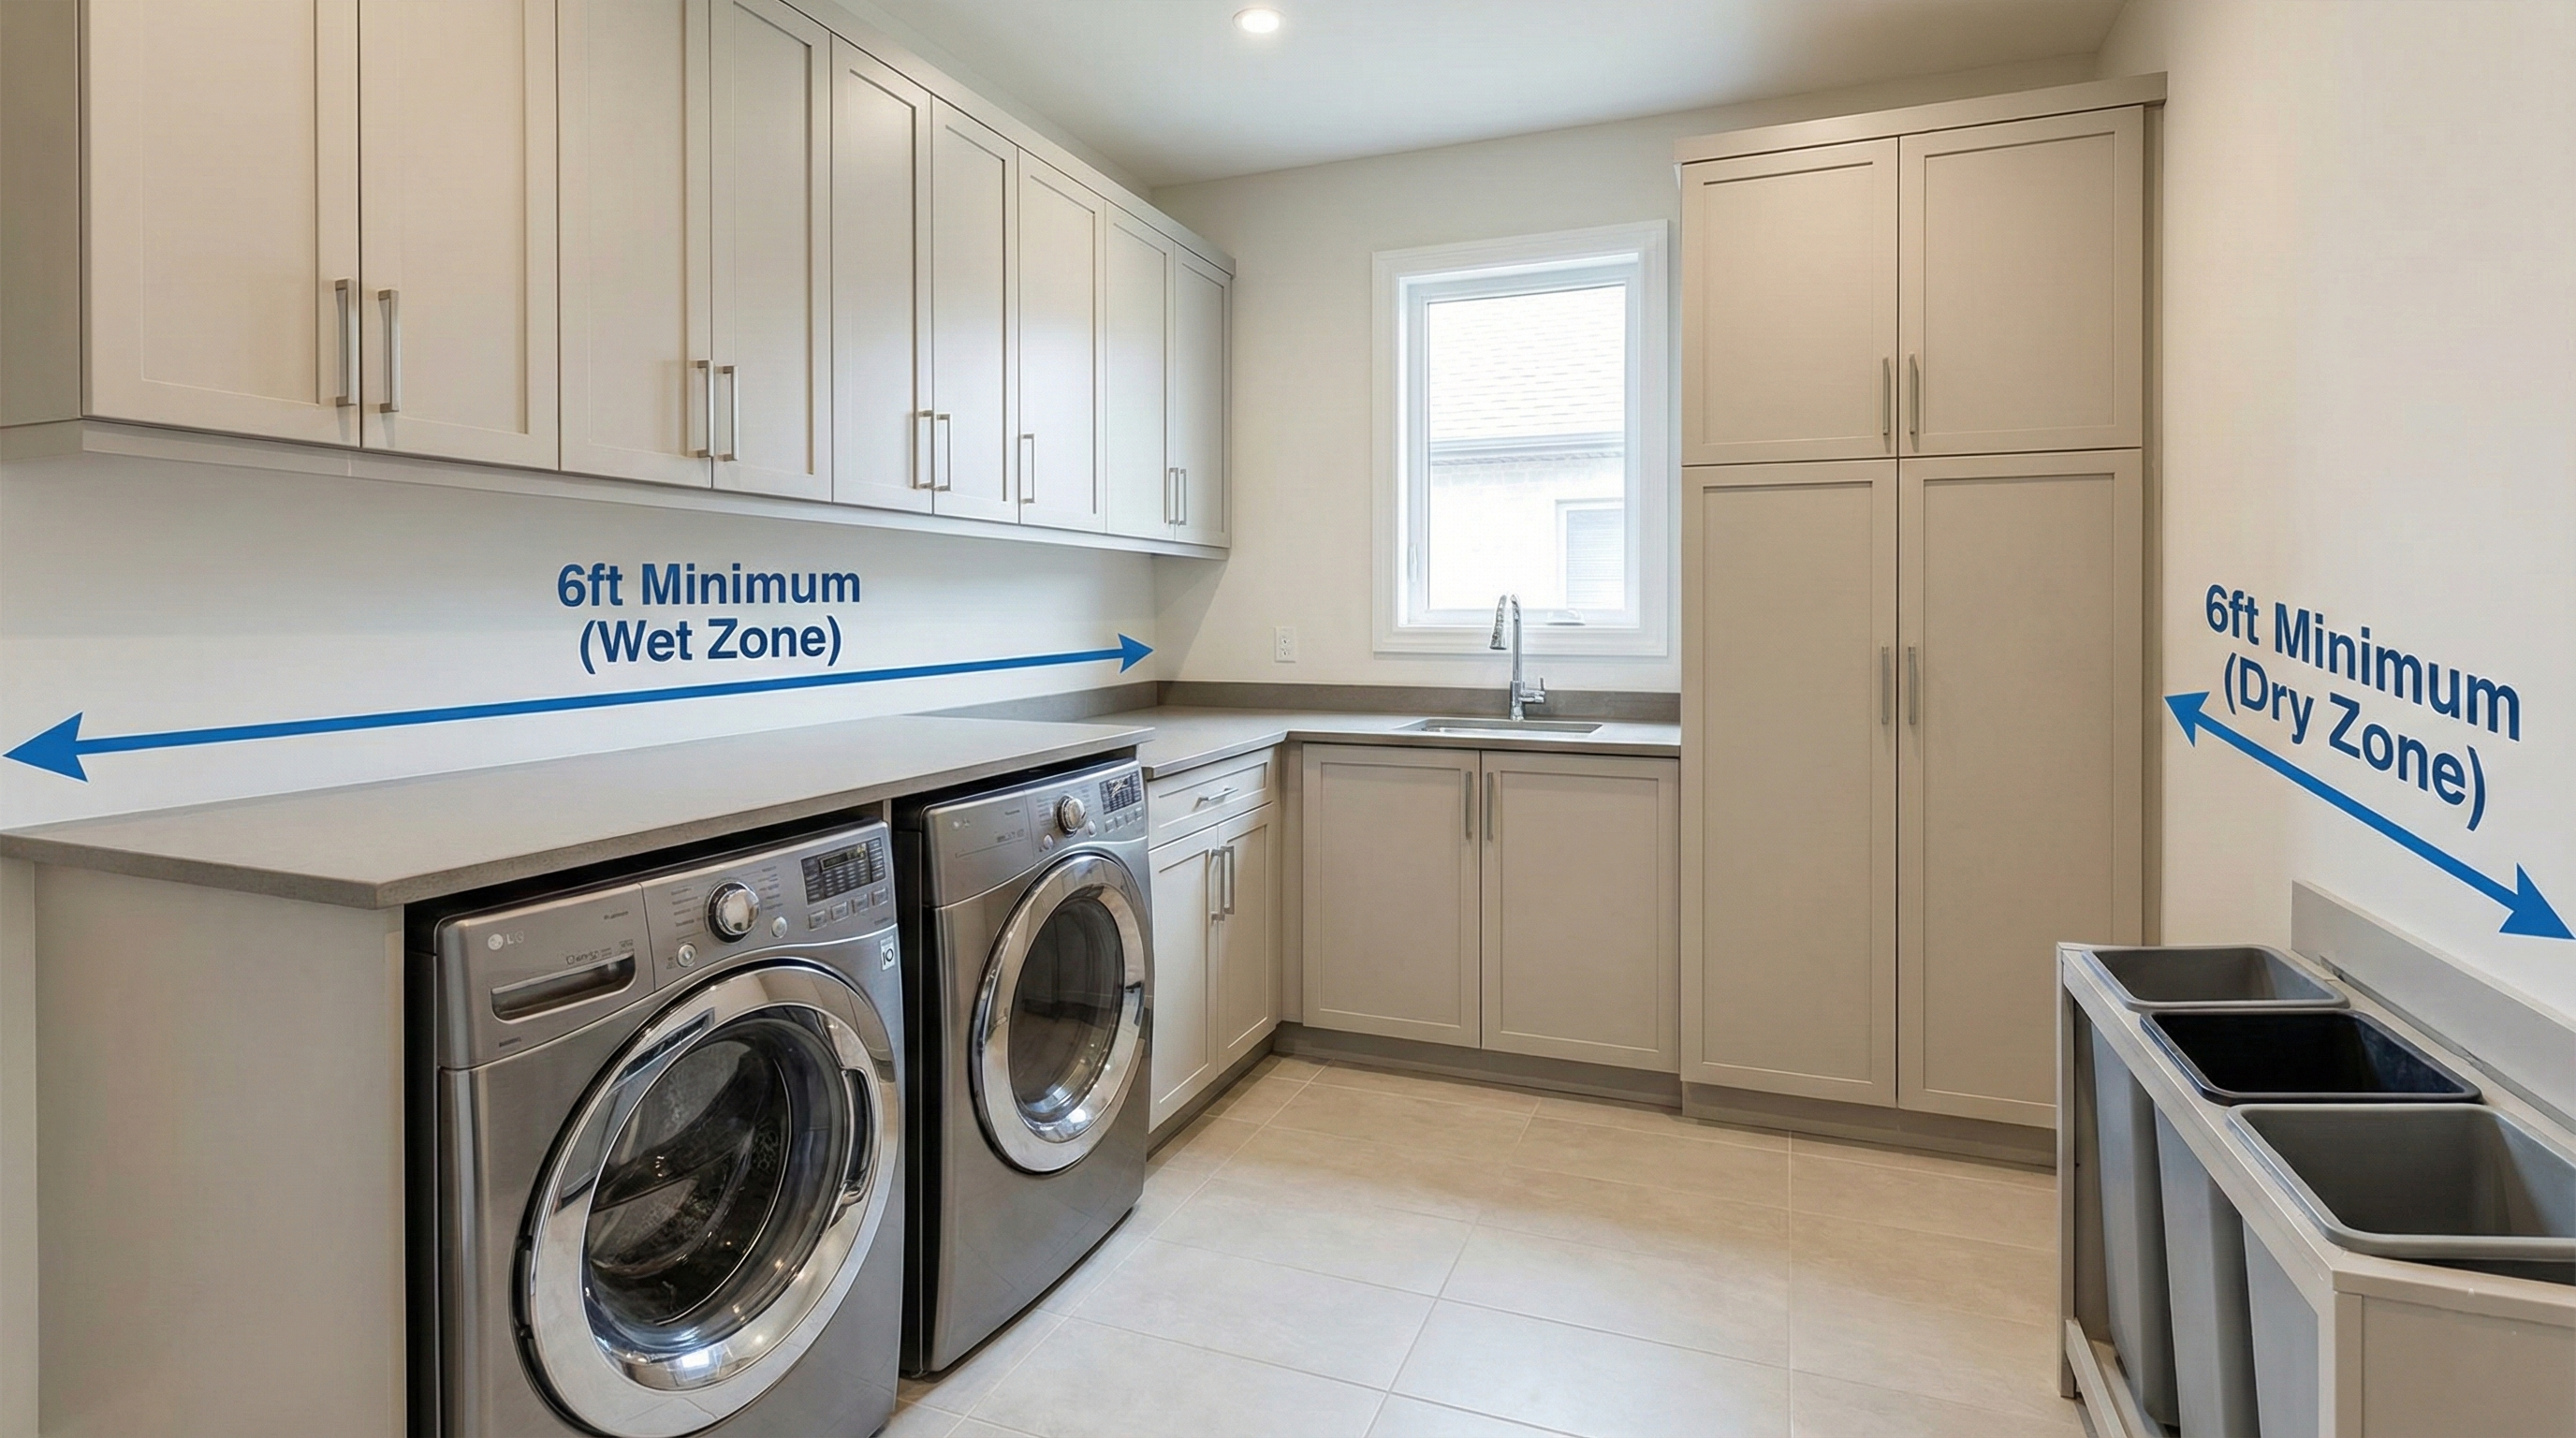
This layout utilizes a corner to create a natural workflow loop, separating the wet zone (sink/washer) from the dry zone (folding/storage).
- Minimum Dimensions:6 feet by 6 feet (1.8 x 1.8 m).
- Strategy:Place the sink and washer on the longer leg of the L to accommodate plumbing runs. Use the corner for a lazy susan cabinet or deep countertop space for bulky items like detergent-sized Costco packs. This layout typically allows for a dedicated sorting bin area at the end of the run.
The U-Shaped Layout
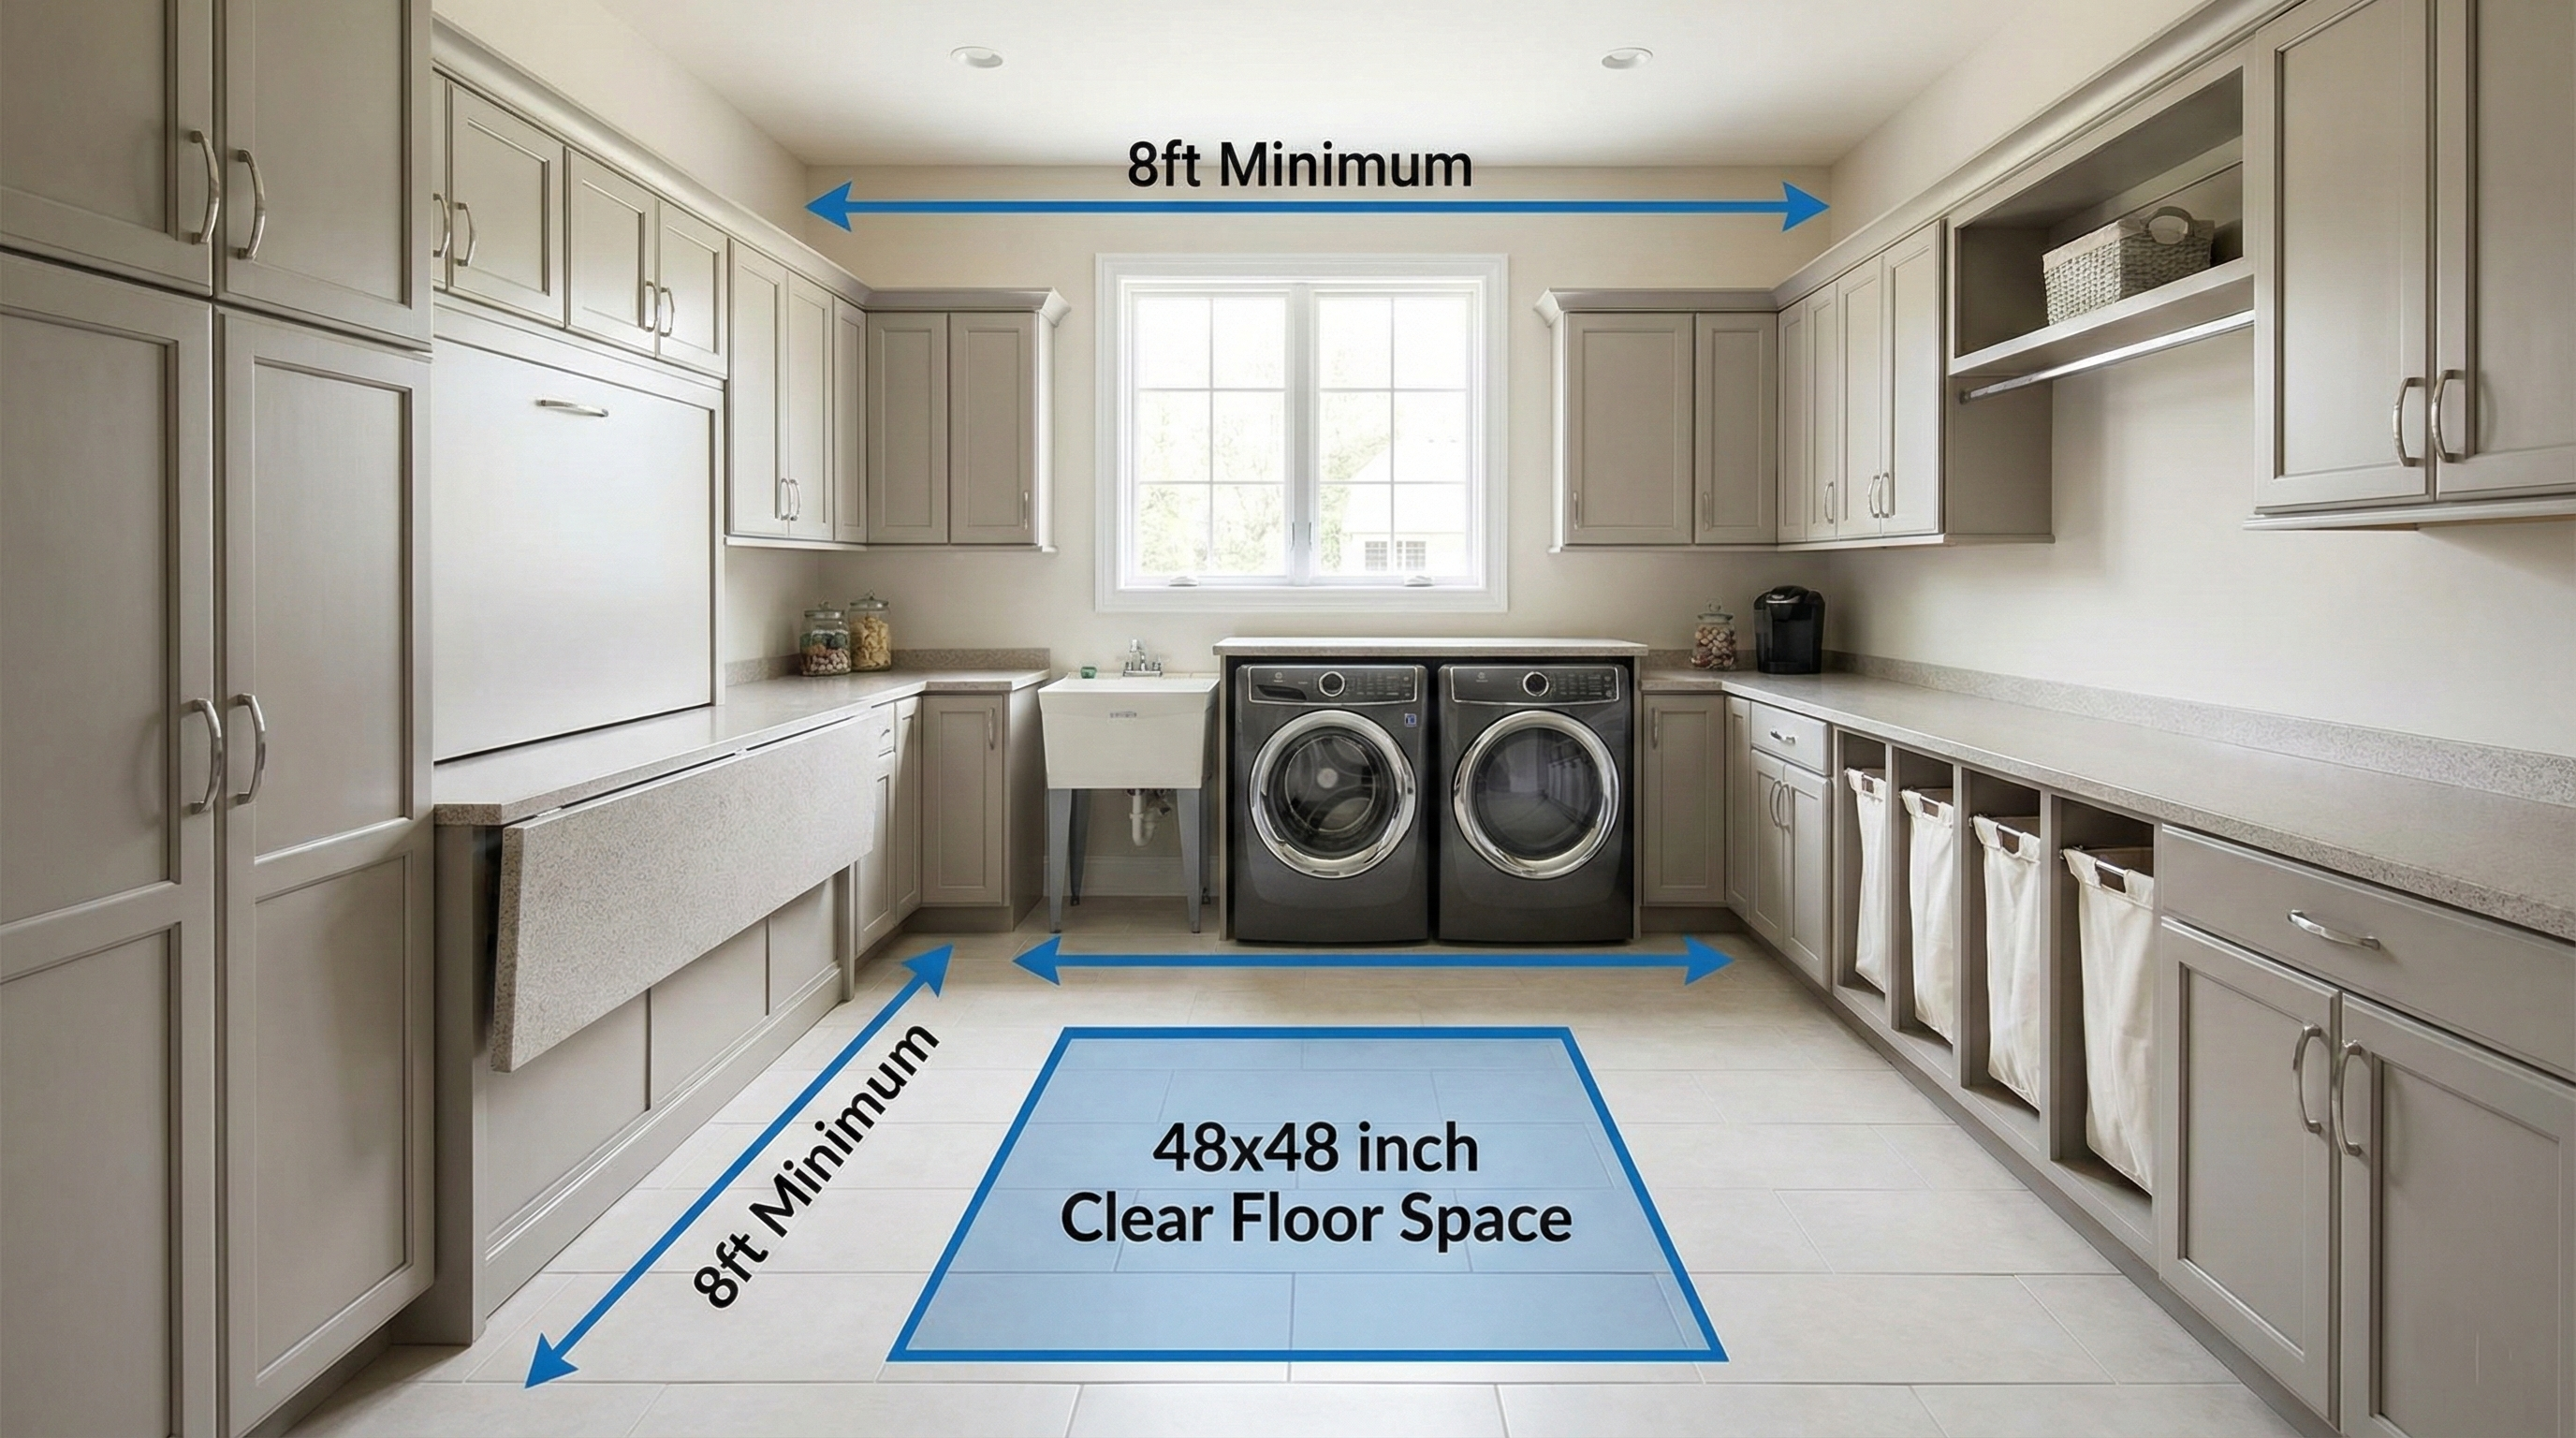
The Cockpit design surrounds the user with functionality. It is the most ergonomic but requires significant square footage.
- Minimum Dimensions: 8 feet by 8 feet (2.4 x 2.4 m).
- Strategy:This layout works best with a central open floor space of at least 48x48 inches. It provides three distinct zones: washing, drying/folding, and storage. However, be careful with corner conflicts-ensure cabinet drawers and appliance doors don't collide when opened simultaneously.
Takeaway:Choose the layout that respects your room's width; forcing a U-shape into a Galley-sized room results in a space where you cannot open the cabinets.
Designing For Specific Room Sizes
We will apply these rules to three common real-world scenarios to show what is realistically achievable.
The 5x7 Laundry Room
This is the standard efficient footprint found in many modern homes.
- Layout:Strictly Galley or Side-by-Side on the 5-foot wall.
- Constraint:You cannot have a deep utility sink and side-by-side machines. You must choose: stacked machines with a sink, or side-by-side machines with no sink.
- Storage:Go vertical. Use tall cabinets to the ceiling to maximize cubic footage since square footage is limited.
The 8x10 Family Laundry Room
This size unlocks the Work Zone potential.
- Layout:L-Shape works beautifully here.
- Features:You can comfortably fit a deep utility sink (24 inches wide), a dedicated hamper sorting section (30 inches wide), and a hanging rod for drying delicate items.
- Traffic:Allows for a 48-inch walkway, meaning one person can be ironing while another passes by with a basket.
The 10x12 Luxury Laundry Room
This moves into Multi-Purpose territory.
- Layout:U-Shape or Island Layout.
- Features:A central island (minimum 3x5 feet) creates a premier folding station. You can integrate pet washing stations, craft storage, or a secondary refrigerator.
- Caution:Don't spread appliances too far apart. Keep the washer and dryer close to the sink to maintain an efficient wet loop.
Takeaway:Whether compact or expansive, the success of the room relies on respecting the limits of the footprint and optimizing the volume within it.
George’s Pro-Tip:The Cardboard Test. Before you commit to a layout, save your large delivery boxes.
Flatten them and tape them together to create a 1:1 scale footprint of your washer, dryer, and island on the floor of your empty room. Walk around them. Carry a laundry basket through the aisles.
If you have to turn sideways to pass the cardboard, your plan is too tight. It is much cheaper to move tape on the floor than to move a framed wall.
Flood Mitigation & Safety: Protecting The Hull
If the laundry room is a high-performance engine, then water and electricity are the fuel and spark. Controlled, they drive the process; uncontrolled, they result in a catastrophic engine fire.
Architecturally, we must treat the laundry room as a wet zone-essentially a shower without a curtain.
Most people don't realize that a burst washing machine hose can discharge up to 650 gallons of water per hour. Without the proper mitigation layers, your invisible inches quickly become inches of standing water.
The Waterproof Envelope: Floor Drains And Pitching
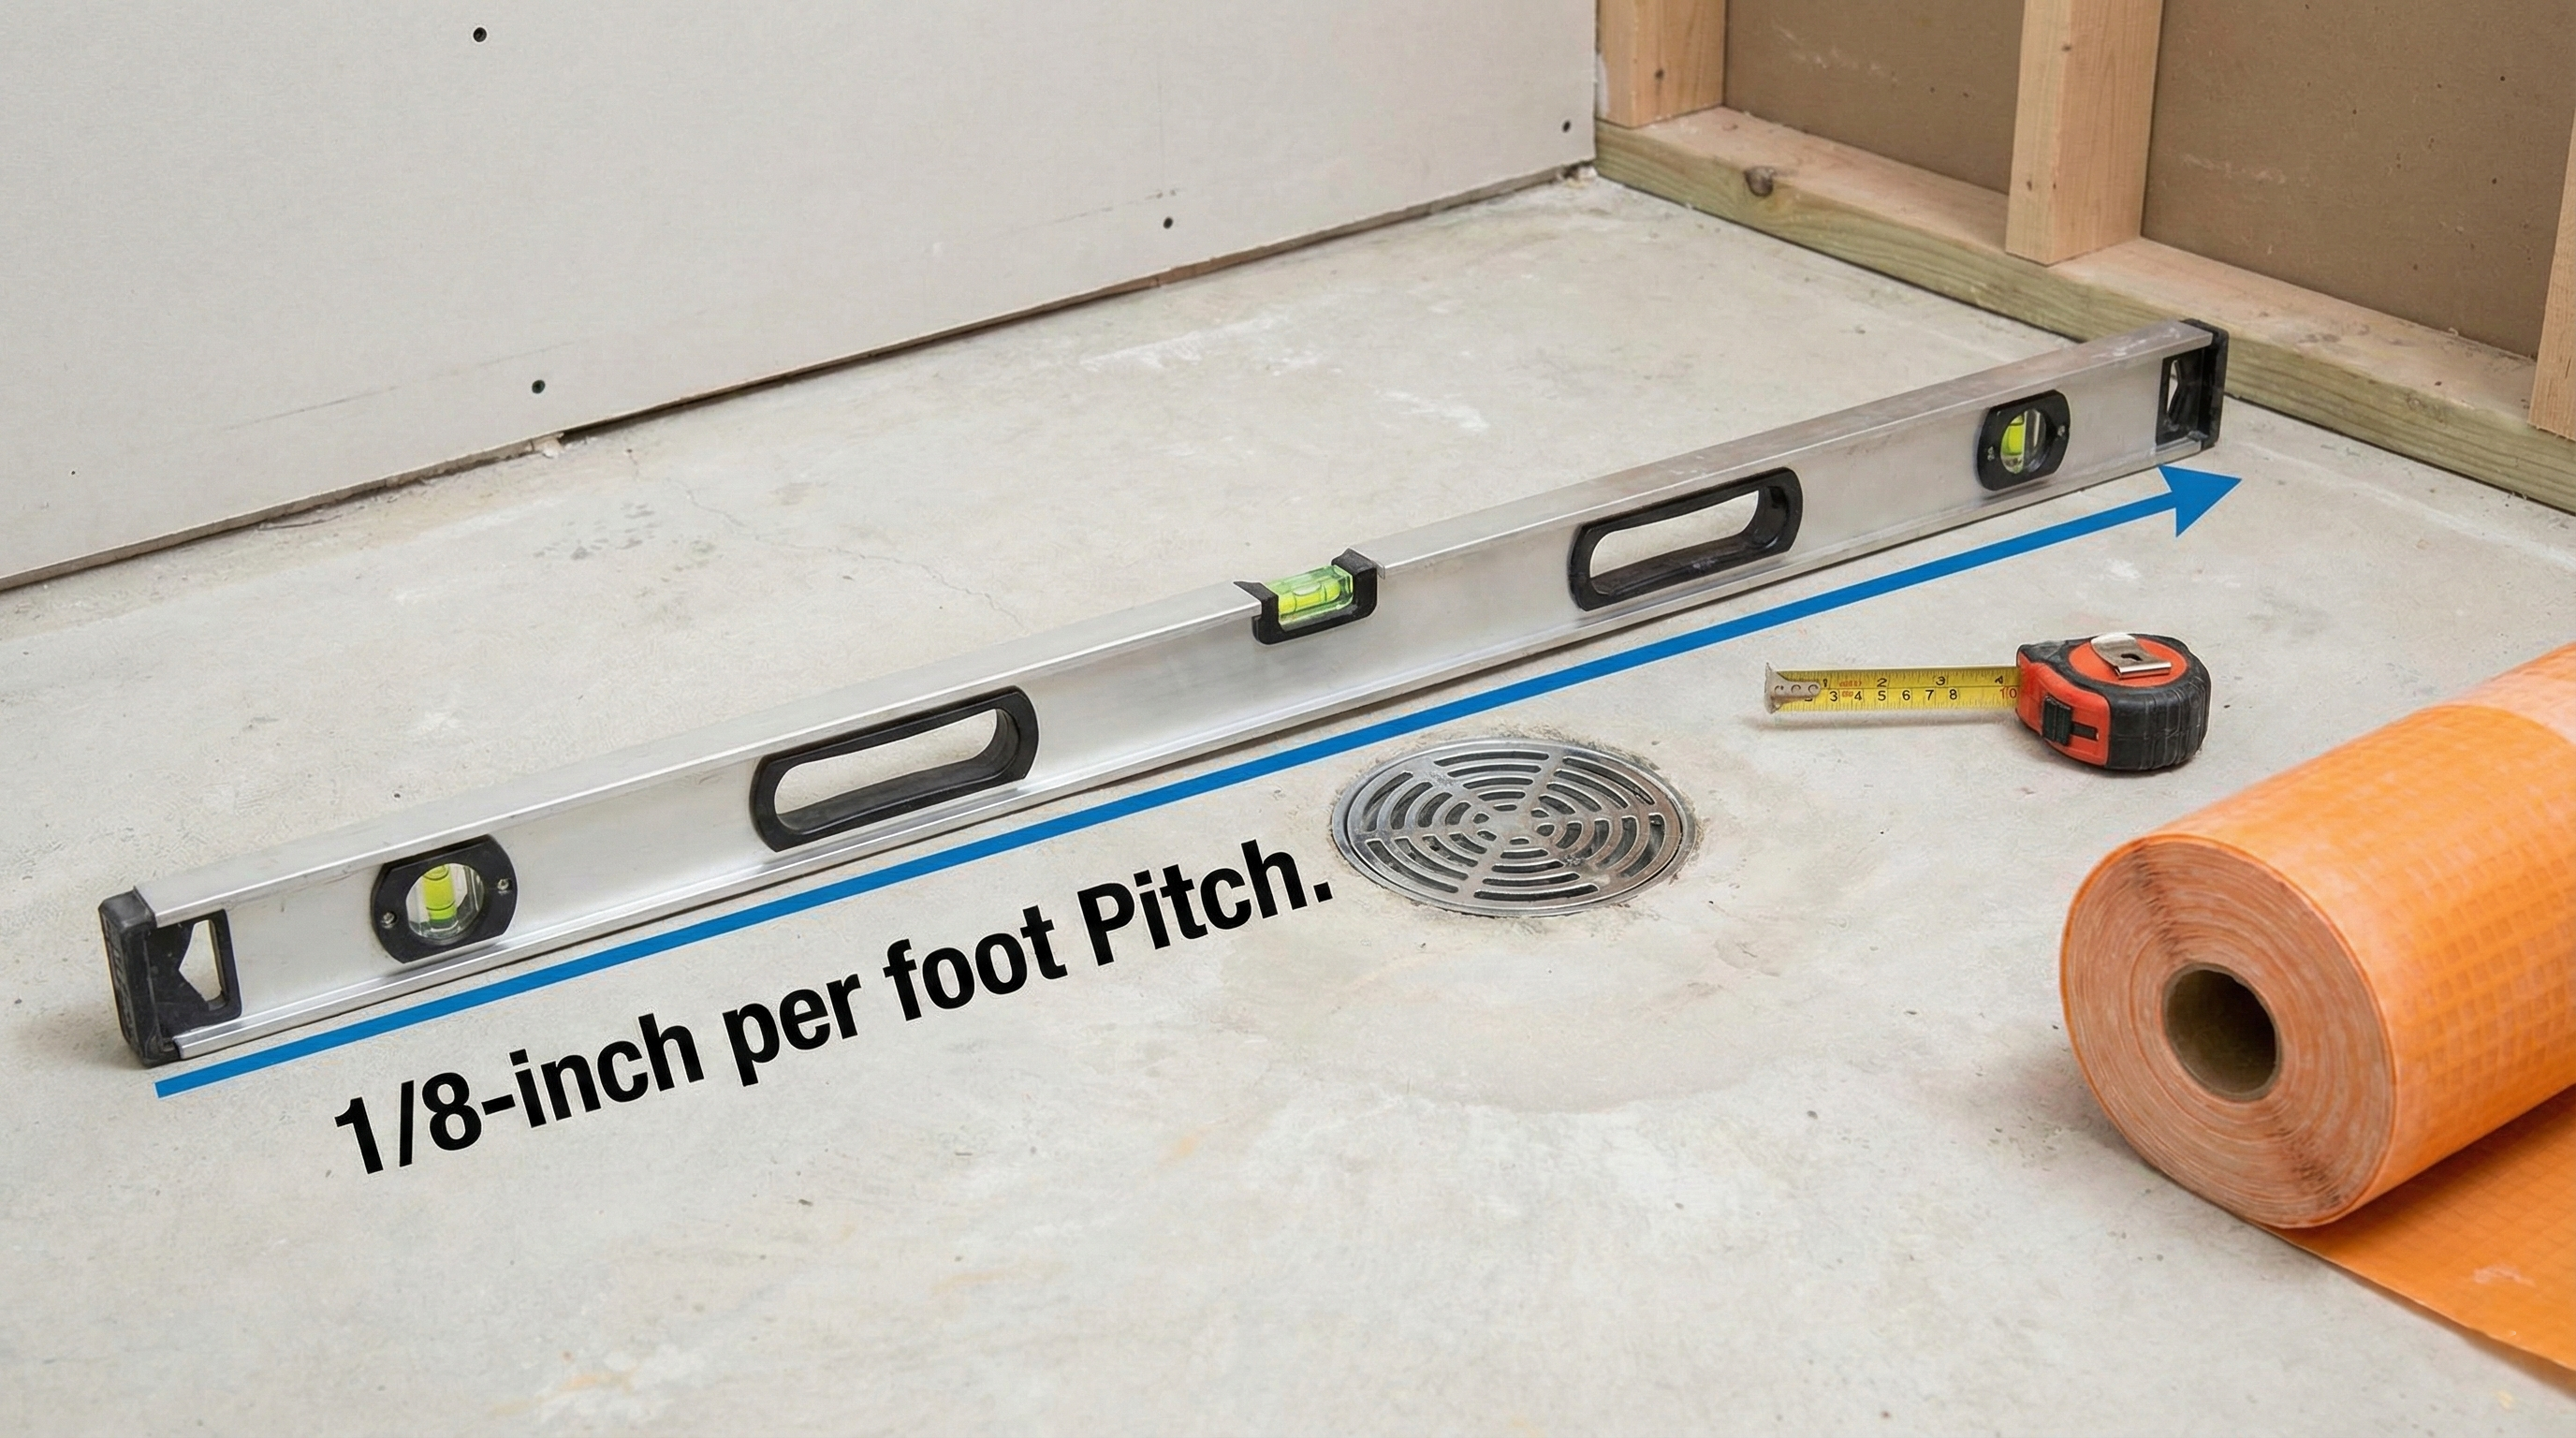
In multi-story homes, a floor drain isn't just a suggestion; it is an insurance policy.
- The Recessed Pan:For machines on upper floors, a pre-formed plastic or stainless steel drain pan is the minimum standard. It catches slow leaks from the door seal or pump.
- The Floor Pitch:In high-end design, we skip the plastic pan and pitch the entire floor $1/8$-inch per foot toward a central floor drain. This requires a waterproof membrane (like Schluter-Kerdi) beneath the tile, transforming the entire floor into a sealed basin.
Smart Shut-Offs: The Digital Safety Valve
In 2026, manual shut-off valves will be replaced by automated intelligence.
- Leak Sensors:Placing a puck-style sensor behind the machine, specifically in the Hose Gap where water first pools, can trigger an immediate notification to your phone.
- Automatic Shut-Off Valves:The gold standard is a motorized valve tied to your sensors. If the sensor detects moisture, it kills the water supply at the source in milliseconds, preventing a burst hose from flooding the house while you're at work.
Electrical Clearances And Gfci Standards
Water and power exist in proximity here, making code compliance a matter of life safety.
- The 6-Foot Rule:In most jurisdictions, any outlet within 6 feet of a water source (sink or washing machine) must be GFCI-protected (Ground Fault Circuit Interrupter).
- Dedicated Circuits:A modern laundry room requires at least two 20-amp circuits-one for the washer and one for the dryer-to prevent tripped breakers during high-load cycles.
The Vibration Gap: Preventing Structural Wear
As mentioned earlier, noise is a form of safety. A machine that walks due to high-RPM vibration can eventually chafe against gas lines or pull on water hoses.
- Side Clearances:Maintain a 1-inch (2.5 cm) buffer on both sides of each machine.
- Vibration Pads:If your laundry room is on a wooden subfloor (common in Galley and L-shaped layouts), heavy-duty rubber anti-vibration pads can absorb the kinetic energy before it transfers into the house's framing.
Pro-Tip:If you are installing a gas dryer, ensure the manual shut-off valve is easily accessible. You shouldn’t have to dismantle a cabinet or move a 200lb machine just to turn off the gas in an emergency.
Ergonomic Vertical Zones: Counters, Cabinets, And Shelving
Ergonomics is the science of designing for the human body. In a laundry room, repetitive motions like lifting wet clothes or reaching for bleach can lead to strain if the heights are incorrect.
Optimal Counter Height For Folding

The standard height for a kitchen counter is 36 inches (91 cm). For a laundry folding station, this is also the industry standard, as it accommodates the average washer/dryer height (plus a countertop).
- The Constraint:Most front-loaders are 38-39 inches tall when on pedestals. If you want a continuous counter over your machines, you must skip the pedestals.
- The Sweet Spot:A counter height of 34-36 inches is ideal for folding. If it is too high, you hike your shoulders; too low, and you slump.
Upper Cabinet Mounting Heights
Don't mount laundry cabinets as high as kitchen cabinets.
- Clearance:Leave 18 inches (46 cm) between the countertop and the bottom of the upper cabinets.
- Depth:Keep uppers to 12-14 inches deep. If they are deeper, you risk banging your head while leaning over the machine to retrieve a stray sock.
The Reach Zone
Store your most frequently used items-detergent, softener, stain remover-between 30 inches and 60 inches off the floor. Anything higher should be reserved for seasonal items or dangerous chemicals you want out of reach of children.
Takeaway:Vertical planning is just as vital as the floor plan; ensure your daily tools sit within the zone of least resistance.
Doors, Windows, And Traffic Flow
This section addresses the access points of the room, ensuring entryways and natural light enhance rather than hinder the workflow.
The door is the gatekeeper of your layout. A standard interior door is often 30 or 32 inches wide. However, for a laundry room, I strongly advocate for a 36-inch (91 cm) door. Why?
Because eventually, that washing machine will break, and dragging a heavy, bulky appliance through a narrow frame is a nightmare you want to avoid.
Swing Direction And Collisions
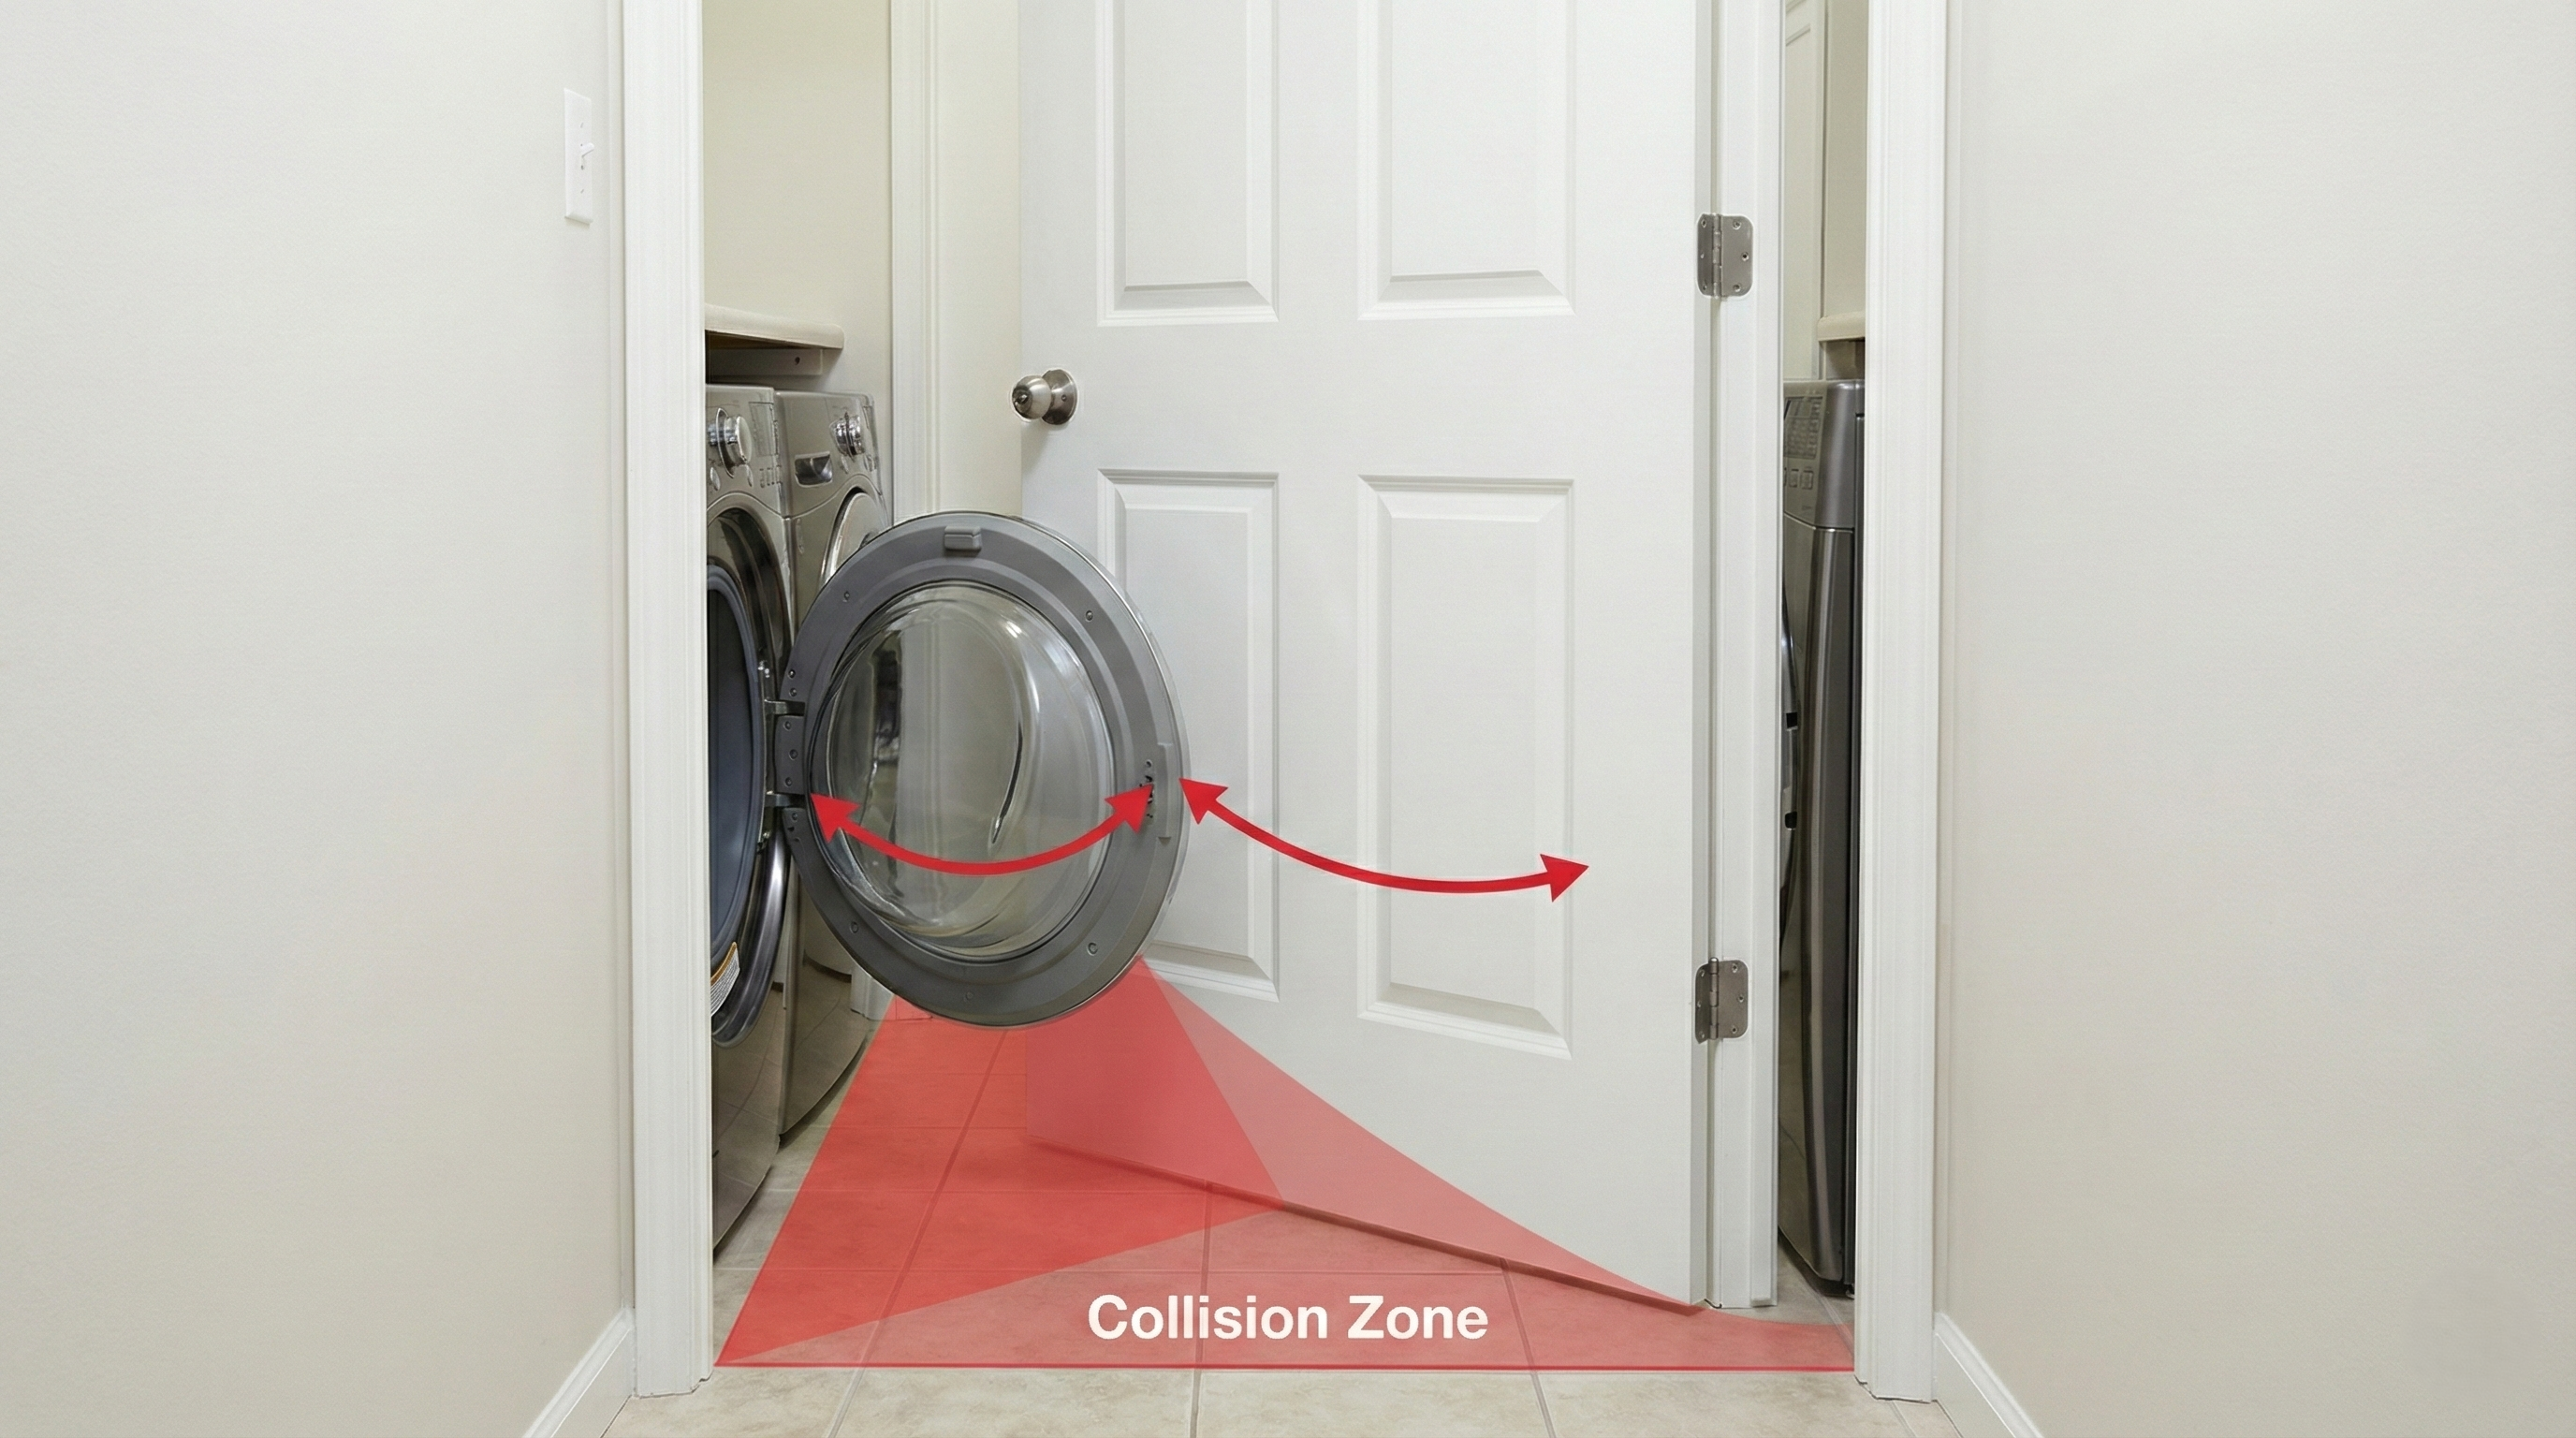
Pay close attention to the Collision Zone. If your entry door swings into the room, ensure it does not overlap with the swing of the washer or dryer door.
If space is tight, use a pocket door or a barn door. These eliminate the swing arc, reclaiming about 9 square feet of usable floor space.
Window Placement
Natural light transforms a chore room into a pleasant workspace. Ensure window sills are at least 40 inches off the floor if the window is above the machines. This allows for the backsplash and prevents items from falling off the counter and breaking the glass.
Takeaway:A door should invite you in, not fight you for space; upgrade to a wider door or a pocket system whenever structural framing allows.
Lighting Solutions For Optimal Laundry Room Performance
Laundry is detail work. If you can’t see a faint stain or read a care label quickly, the room is under-lit, even if it feels bright.
Use A Layered Lighting Plan
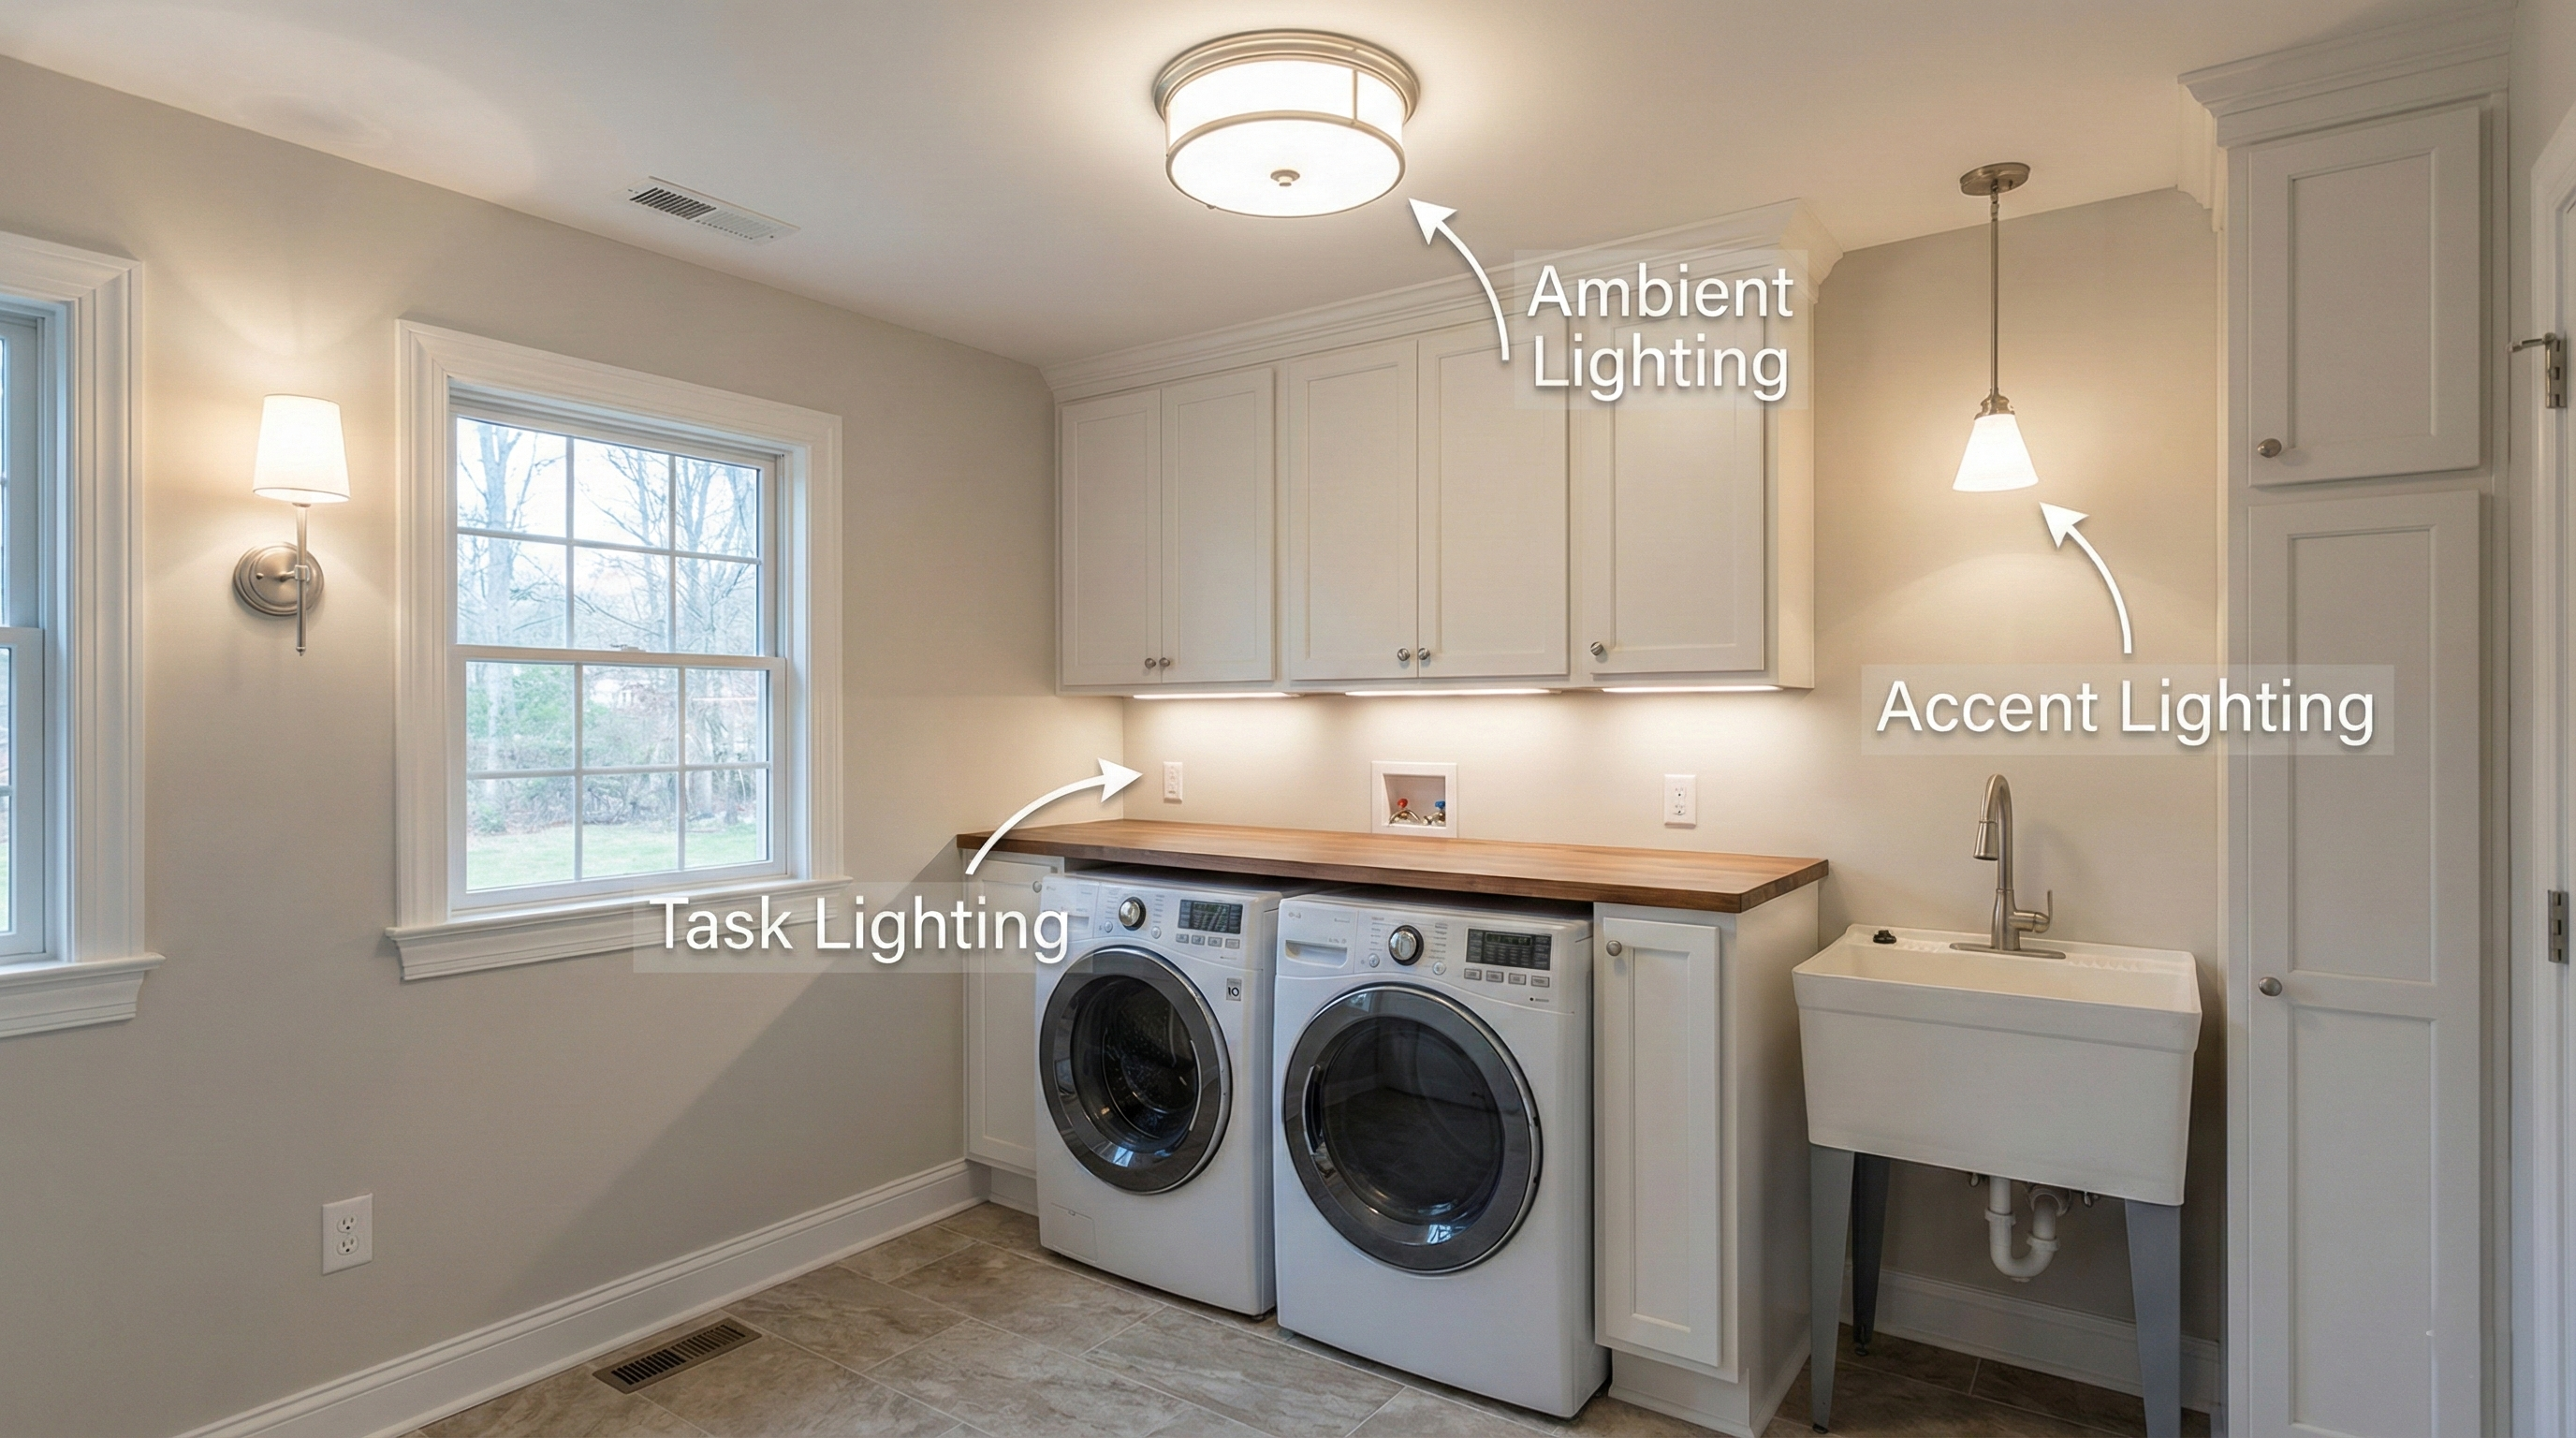
Ambient (general) light:Start with an even ceiling light so the whole room isusable, especially corners, doorways, and the space in front of machines.
Task lighting:
- Folding counters
- Sink/stain-treatment area
- Sorting zone (baskets, hampers, pullouts)
Under-cabinet LED strips or slim linear fixtures reduce shadows at counter height and make small laundry rooms feel more precise.
Vertical illumination:A lot of laundry seeing happens on vertical surfaces: shirt fronts, towels held up, labels in your hands. Adding a wall sconce, wall-wash fixture, or a downlight aimed toward the machine face/back wall improves clarity and reduces harsh shadows.
Aim For Usable Brightness, Not Glare
Design guidance commonly targets 30-50 footcandles in task-oriented areas as a practical benchmark range for visibility. You don’t have to measure footcandles at home-just use it as a sanity check: if the folding surface feels dim at night, add task lighting.
Choose A Light Quality That Helps You Judge Fabric And Stains
- Neutral white usually works best for laundry tasks (balanced, not yellow, not icy).
- Look for high CRI lighting if possible (better color rendering makes stain-checking easier).
- Use diffusers or frosted lenses to avoid glare when you’re facing the machines.
Controls That Make Laundry Smoother
- Separate switches for ambient and task lighting.
- An occupancy sensor is ideal when you enter carrying baskets.
- Dimming helps if the room has daylight at some hours and none at others.
Takeaway:Great laundry lighting is less about more lumens and more about light placed where you work, with minimal shadow and glare.
Ventilation Solutions For Optimal Laundry Room Performance
Ventilation is what keeps a laundry room from turning into a warm, damp pocket of the house. It also protects appliance performance and helps manage lint and odors.
Dryer Exhaust: Plan The Route Before You Finalize The Layout
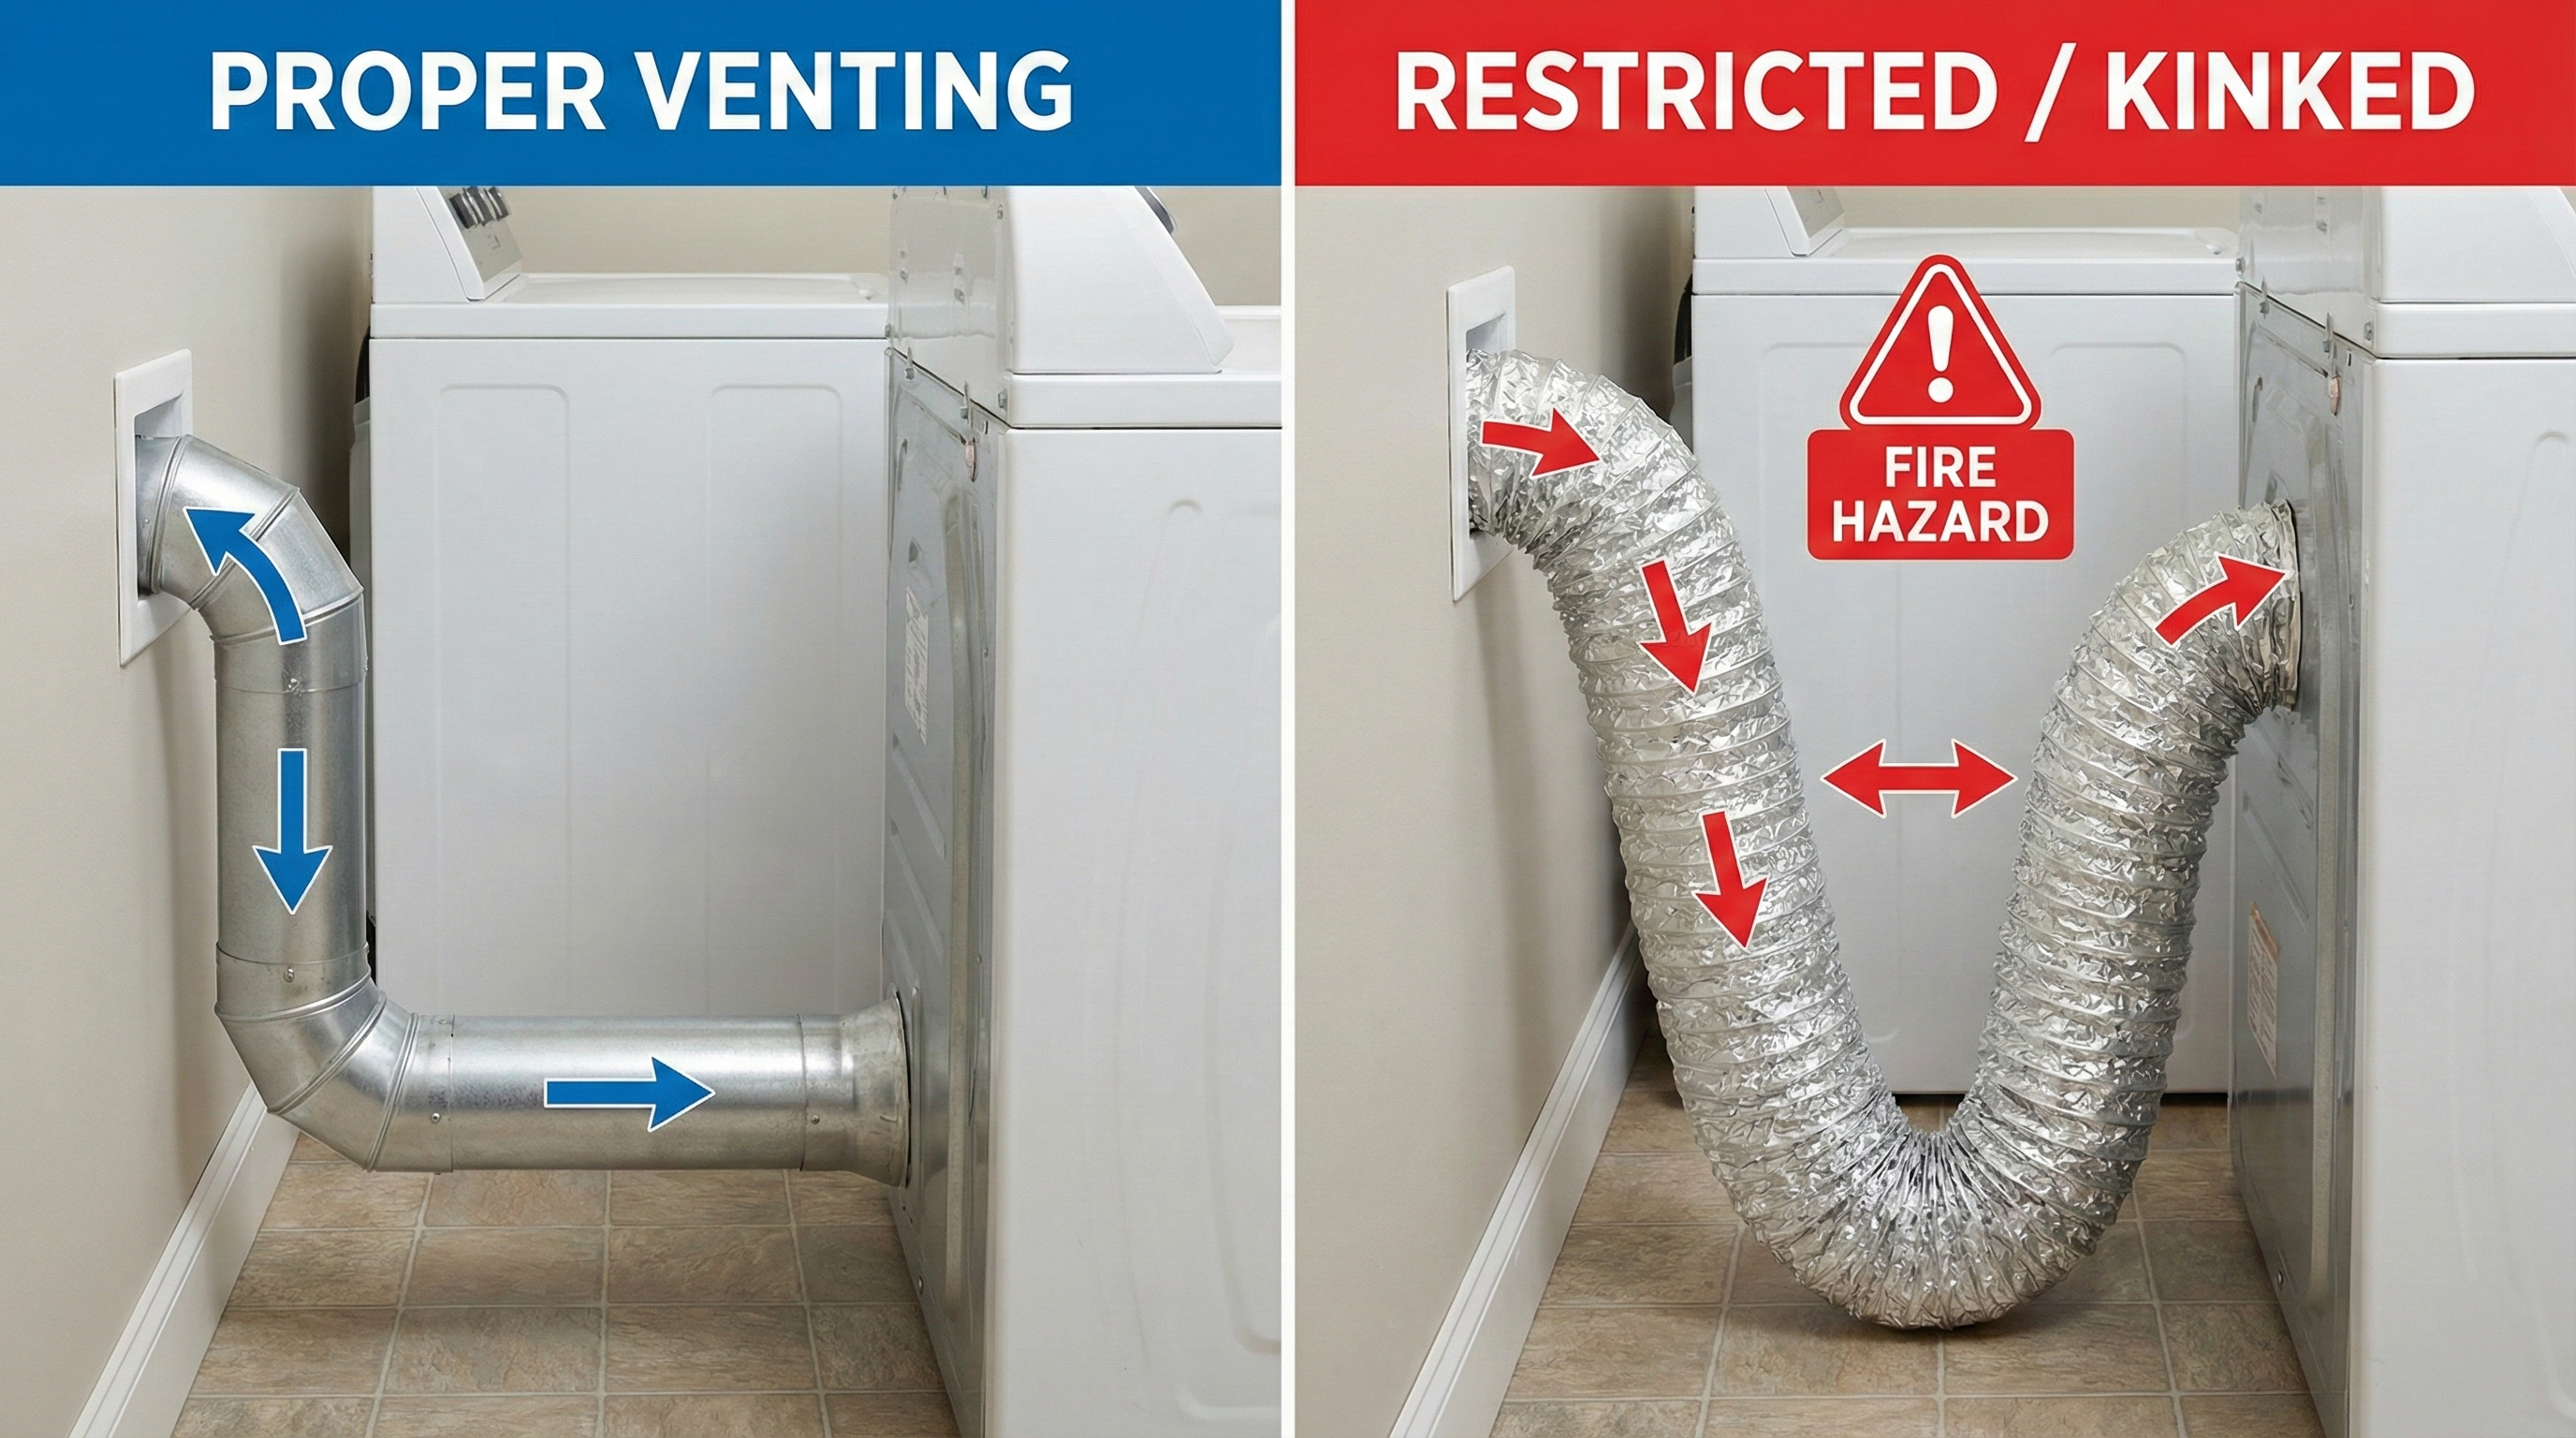
Dryer venting can dictate where the dryer belongs. The 2021 International Residential Code(IRC) states a maximum dryer exhaust duct length of 35 feet (10,668 mm), reduced when fittings (like elbows) are used. Even if your jurisdiction uses a different code edition, this is a useful planning boundary: long runs and lots of turns reduce airflow and can create maintenance issues.
Layout moves that improve vent performance:
- Keep the dryer close to an exterior wall when possible.
- Minimize turns; avoid accordion-style venting.
- Leave access so the duct doesn’t get crushed and can be cleaned.
Room Moisture Control: Exhaust The Space If It’s Enclosed
Laundry rooms generate humidity (wet clothes, steam, sink splashes). In a closed or interior laundry room, a dedicated exhaust fan helps keep the space comfortable and reduces moisture lingering on surfaces.
ENERGY STAR’s ventilation fan criteria are useful here because it evaluates fans on performance factors that matter in real installations.
Put the exhaust fan where moisture accumulates-often near the dryer and/or sink-then duct it efficiently.
Closet Installs: Confirm Airflow Requirements Early
If your washer/dryer sits in a closet, some manufacturers' instructions note that closet doors may require ventilation openings, and local requirements should be checked.
Maintenance Access Is A Ventilation Strategy
Fire-safety guidance consistently highlights lint buildup and restricted exhaust flow as a dryer fire risk factor. So, good ventilation design also means:
- You can reach and clean the lint filter easily.
- You can access the vent connection for inspection/cleaning.
- You can pull the dryer out without dismantling cabinetry.
Takeaway:The best ventilation plan is the one that keeps airflow strong and keeps the vent route cleanable for the life of the room.
Learn More: Kitchen Work Triangle Vs Zone Design
Frequently Asked Questions
What Is The Standard Size For A Laundry Room?
There isn’t one standard; size depends on layout, appliances, and storage plan, from appliance dimensions plus working clearances.
What Is The Minimum Size For A Laundry Room?
The minimum is the appliance envelope plus door swing and standing space; closets can work if clearances are respected.
Is 5 Feet Wide Enough For A Laundry Room?
Sometimes, usually for a single-wall or closet approach, side-by-side layouts often need more width plus clearance for doors.
What Is The Ideal Layout For A Laundry Room?
The ideal layout matches your workflow (sort→wash→dry→fold→hang) with the fewest steps and no clearance conflicts.
How Much Space Do I Need In Front Of A Washer And Dryer?
Plan enough space to open doors fully and stand comfortably; front-loaders typically need more working clearance than closets.
How Deep Should A Laundry Room Be?
Depth must include machine depth plus hoses/venting behind and enough space in front for access and door swing.
What Is The Minimum Door Size For A Laundry Room?
Choose a door that allows moving appliances in and out; wider openings reduce pinch points and awkward turns.
Should The Laundry Door Swing In Or Out?
If space is tight, avoid swinging into your working zone; pocket/sliding doors can protect aisle clearance.
What’s The Best Layout For A Narrow Laundry Room?
A single-wall or galley layout usually performs best-keep a clear standing zone and put storage vertically.
Can I Fit Side-By-Side Machines In A Closet?
Only if the closet width and door opening allow installation and operation with the manufacturer’s required clearances.
What Counter Height Is Best For Folding Laundry?
Aim for a comfortable standing height; adjust based on user height and whether you fold seated or standing.
How Deep Should Laundry Cabinets Be?
Use standard cabinet depths to avoid crowding the aisle; deeper cabinets quickly steal circulation space in small rooms.
Do I Need A Sink In The Laundry Room?
Not required, but it improves stain-treating and cleanup-plan sink width/depth plus landing space if you include it.
How Do I Plan A Stacked Washer-Dryer Layout?
Start with the stacked unit footprint, then ensure door access, ventilation needs, and a clear standing area in front.
What Safety Issues Affect Laundry Room Dimensions?
Vent routing, access for maintenance, and keeping lint/ducts clear can drive spacing decisions and layout feasibility.
Conclusion
A successful laundry room is not defined by the price of the appliances or the pattern of the tile. It is defined by the flow.
It is the ability to pull a hot shirt from the dryer, turn, and fold it on a counter without taking a step. It is the ease of opening a door without holding your breath.
By respecting these dimensions-the walkway widths, the hose gaps, and the reach zones-you are doing more than renovating a room.
You are building efficiency into your daily life. Measure twice, respect the invisible inches, and build a space that supports the work you do.
Jump to
Mastering Laundry Room Layout Dimensions: Standards, Clearances, And Flow
The Invisible Inches: Why Dimensions Matter More Than Square Footage
What Most People Want In A Laundry Room?
Standard Appliance Dimensions & The Real Footprint
Critical Layout Archetypes: Dimensions & Floor Plans
Designing For Specific Room Sizes
Flood Mitigation & Safety: Protecting The Hull
Ergonomic Vertical Zones: Counters, Cabinets, And Shelving
Doors, Windows, And Traffic Flow
Lighting Solutions For Optimal Laundry Room Performance
Ventilation Solutions For Optimal Laundry Room Performance
Frequently Asked Questions
Conclusion

George Evans
Author
George Anderson, an exceptional architectural designer, envisions and brings to life structures that transcend the realm of imagination. With an unwavering passion for design and an innate eye for detail, George seamlessly blends form and function, creating immersive spaces that inspire awe.
Driven by a deep appreciation for the interplay of space, light, and materials, George's innovative approach redefines the possibilities of architectural design. His visionary compositions leave an indelible mark, evoking a sense of wonder and transforming the built environment.
George Anderson's transformative designs and unwavering dedication continue to shape the architectural landscape, pushing the boundaries of what is possible and inspiring generations to come.
Latest Articles
Popular Articles